Basic React
Welcome
Connect
community.infinite.red
#campminder-training
Frank
von Hoven
-
Senior Software Engineer
-
React Native Newsletter
- Editor-in-Chief


Ryan Linton
-
Señor Software Engineer
-
Master of the Serious

Intro to JavaScript
A brief history...
- 1995 - Created at Netscape by Brendan Eich
- early 1996 - First released with Netscape 2
- mid 1996 - Microsoft releases JScript with IE 3
- late 1996 - Netscape submits JavaScript to ECMA International, resulting in the first edition of the ECMAScript standard (i.e. ES1)
- 1999 - ES3, a significant update to the standard is released, stable ever since
- 1999-2009 - ES4 started and abandoned
- 2009 - ES5 released
- 2015 - ES6/ES2015 released, yearly release cycle adopted
Types
- Number
- String
- Boolean
- Symbol (new in ES6/ES2015)
- Object
- Function
- Array
- Date
- RegExp
- null
- undefined
Numbers
- double-precision 64-bit format IEEE 754 values
0.1 + 0.2 // 0.30000000000000004- standard arithmetic operators are supported
1 - 2 + 3 * 4 / 5 % 6 // 1.4- convert strings to integers using parseInt()
  parseInt('123', 10)   // 123
  parseInt('010', 10)   // 10
parseInt('hello', 10) // NaN (i.e. Not a Number)- special values for NaN, Infinity, -Infinity
  NaN + 5            // NaN
  NaN === NaN        // false
  isNaN(NaN)         // true
  1 / 0              // Infinity
  -1 / 0             // -Infinity
  isFinite(Infinity) // false
Strings
- sequences of UTF-16 code units
- each unicode character is represented by either 1 or 2 code units
  "\u03BB" === "λ"
"\uD83D\uDC10" === "🐐"- can be used like objects with many properties and methods to explore
  "react".length        // 5
  "react".charAt(0)     // "r"
  "react".toUpperCase() // "REACT"
  "hello, world".replace("world", "react") // "hello, react"
Other Types
- null indicates a deliberate non-value
- undefined indicates an uninitialized variable
null !== undefined // trueThe following values are falsey
  Boolean(false)     // false
  Boolean(0)         // false
  Boolean("")        // false
  Boolean(NaN)       // false
  Boolean(null)      // false
  Boolean(undefined) // false
All other values are truthy
Operators & Control Structures
Similar set of operators and control structures to other languages in the C family
  // logical operators
  true && false || 0 // 0

  // conditional statements
  if (true && 1) {
    // always executed
  } else if(false || 0) {
    // never executed
  } else {
    // also never
  }

  // ternary operator
  true
    ? "an expression"
    : "" // "an expression"
  // while loops
  while(true) { /* loop forever */ }
  do {
    /* execute once; loop never */
  } while(false)

  // for loops
  for (let i = 0; i < 5; i++) {
    // execute 5 times
  }
  for (let value of [1,2,3]) {
    // do something with value
  }
  for (let property in { key: 'value' }) {
    // do something with object property
  }
Objects
- can be thought of as simple collections of name-value pairs
- Similar to Hash tables in C and C++, HashMaps in Java, or Dictionaries in Python
  // create using the new keyword
  new Object()

  // or literal
  let obj = {
    name: "Mappy",
    role: "associates stuff"
  }

  // access with brackets
  obj["name"] // "Mappy"

  // or dot notation
  obj.role // "associates stuff"
  // a prototype
  function Person(name, age) {
    this.name = name;
    this.age = age;
  }

  // an instance
  const frank = new Person("Frank", 38)

  // ES6 adds the following sugar
  class Frank extends Person {
    constructor(props) {
      super(props)
    }
  }
Arrays
- actually a special type of object
- work very much like regular objects (numerical properties can naturally be accessed only using [] syntax) but they have one magic property called 'length'
  // create with new
  const a = new Array()

  // or literal syntax
  const snacks = ["tacos","nachos","cheetos"]

  // iterate with for loop
  for(const snack of snacks) {
    eat(snack)
  }

  // or with an iterator method
  snacks.map(function(snack) {
    return snack.toUpperCase()
  })
Functions
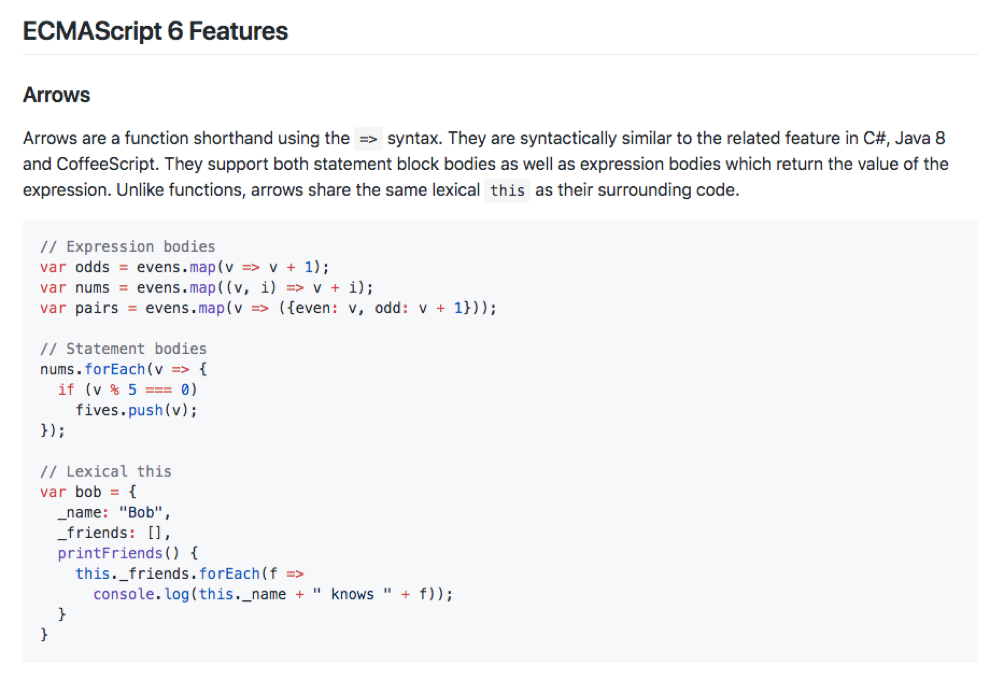
ES6 / ES2015
ES6
New variable types
let
const
var
NEVER
Sometimes
Always
ES6
// var declaration
function varTest() {
  var x = 1
  if (true) {
    var x = 2  // same variable!
    console.log(x)  // 2
  }
  console.log(x)  // 2
}
New variable types
- function scoped
// let declaration
function letTest() {
  let x = 1
  if (true) {
    let x = 2  // different variable
    console.log(x)  // 2
  }
  console.log(x)  // 1
}
var
- global (declared outside any function)
- block-scoped - only available in the block in which they are declared
let
ES6
const key = "mykey"

key = "newkey"

// error "key" is read only
New variable types -
const
- read-only reference to a value
- variable cannot be reassigned
ES6
const person = {
  name: "Jennifer",
  age: 43,
  occupation: "Dentist",
}

person.name = "Jim"
New variable types -
const
{
  "age": 43,
  "name": "Jim",
  "occupation": "Dentist"
}
➡
ES6
Arrow functions
ES5
ES6
var sayName =
function() {}
const sayName =
() => {}
() => {}
this
bound to global

ES6
const getFullName = (first, last) => {
  return first + " " + last
}
Functions - implicit vs explicit return
var getFullName = function(first, last) {
  return first + " " + last
}
ES5
ES6
const getFullName = (first, last) => first + " " + last

const getFullName = (first, last) =>
  first + " " + last
explicit
implicit
explicit
ES6
ES6
const sayName = (name) => console.log("I am " + name + " !")Arrow functions
Parameters
const sayName = name => console.log("I am " + name + " !")const addThree = (a, b, c) => a + b + cES6
const abc = ["a", "b", "c"]
const def = ["d", "e", "f"]
const alpha = [ ...abc, ...def ]

["a", "b", "c", "d", "e", "f"]
Spread operator
Spread array
const basics = {firstName: "Frank", lastName: "von Hoven"}
const attributes = {job: "Software Engineer"}
const person = {...basics, ...attributes, eyes: "brown"}

{
  firstName: "Frank",
  lastName: "von Hoven",
  job: "Software Engineer",
  eyes: "brown"
}
Spread object
...ES6
const name = person.name
const height = person.height
const location = person.location


console.log(name, height, location)
Object { destructuring }
ES5
const {
  name,
  height,
  location,
  sports
} = person

console.log(name, height, location)
ES6
const person = {
  name: "Chris",
  hairColor: "brown",
  height: "6'1",
  location: "Boulder",
  sports: ["football", "tennis"]
}
// "Chris", "6'1", "Boulder"ES6
const lettuce = toppings[0]
const pickles = toppings[1]


console.log(lettuce, pickles)
Array [ destructuring ]
ES5
const [lettuce, pickles] = toppings
// destructure toppings by index


console.log(lettuce, pickles)
ES6
const toppings = [
  "lettuce",
  "pickles",
  "tomatoes",
  "onions"
]
// "lettuce", "pickles"Further Reading
https://github.com/lukehoban/es6features
ES6
JSX
JSX
- JSX is a syntax extension, compiled in a preprocessor step that adds XML syntax to JavaScript.
- You can definitely use React without JSX but JSX makes React a lot more elegant.
JSX
This:
Compiles to:
<p style={{ color: "blue" }}>
  Click Me
</p>
React.createElement(
"p",
{style: { color: "blue"}},
"Click Me"
)
React & React Native use JSX
const MyComponent = <p>Hello World</p>const MyImage = <img src={someSource} style={styleObj} /><MyComponent/>
<MyImage/>Use in JSX like this:
Embedding Expressions into JSX
const person = { name: "Chris", age: 22 }const MyComponent = <p>Hello { person.name }</p>Embedding Expressions into JSX
const person = { name: "Chris", age: 22 }const MyComponent = <p>Hello { getName() }</p>const getName = () => person.name Logic with JSX
renderLegalPerson = () => {
  const person = { name: "Chris", age: 22 }
  if (person.age >= 20) {
    return <p>{person.name}</p>
  } else {
    return <p>Age is below 20</p>
  }
}


...

<div>
  { this.renderLegalPerson() }
</div>

...
Logic with JSX
const person = { name: "Chris", age: 22 }

<p>{person.name} { person.age > 20 ? "Is over 20" : "Is not over 20" }</p>
ternary operator
JSX
- Concise HTML/XML-like structures in the same file as our JavaScript code
- These expressions ➡ actual JavaScript code
tl;dr
- Syntactic sugar
React Philosophy
What is React?
-
Declarative
- "Make me a sandwich"
-
Component-Based
- Encapsulated components that manage their own state
- Compose them to make complex UIs.
- Building blocks to make your app
- Encapsulated components that manage their own state
-
Learn Once, Write Anywhere
- Use React on the web and on mobile - React Native
UI Framework

Hello World
- Create first component
- Pass props
Preview
Basic React Concepts
"Components"
class MyComponent extends React.Component {
  render() {
    return (
     <p>Hello World</p>
    )
  }
}
Class
const MyComponent = () => (
  <p>Hello World</p>
)
<MyComponent />Function
vs
Components ➡ React elements - what should appear on the screen.
Styling
Styles can be created one of three ways:
- inline
- object
- CSS
Styling
inline styles
<p style={{color: "red"}}>Hello World</p>

<div style={{width: 300}}/>
Styling
style object
const styles = {
  text: {
    color: "red"
  }
}

<p style={styles.text}>Hello World</p>
Styling
...

const styles = {
 text: {
    color: 'red'
  }
}

<p style={[styles.text, { fontSize: 32 } ]}>Hello World</p>
Combining inline styles with style object
with an array of styles
Styling
Dynamic styling
state = {
  warning: true
}

...

render() {
  const fontColor = this.state.warning ? 'red' : 'black'
  return (
    <div>
      <p style={{color: fontColor}}>Hello World</p>
    </div>
  )
}
Styling
- Styles usually match CSS
backgroundColor
background-color
vs
- Prop names are camelCased
Styling
CSS
import "./styles.css"

...

<div className="container">
  <p className="funText">Hello World</p>
</div>


...


// in styles.css

.container {
  text-align: center;
}

.funText {
  color: fuchsia;
  font-size: 100px;
}
code
Kid Counter
with React Component
- Introduce local state
- Able to write to and read from local state
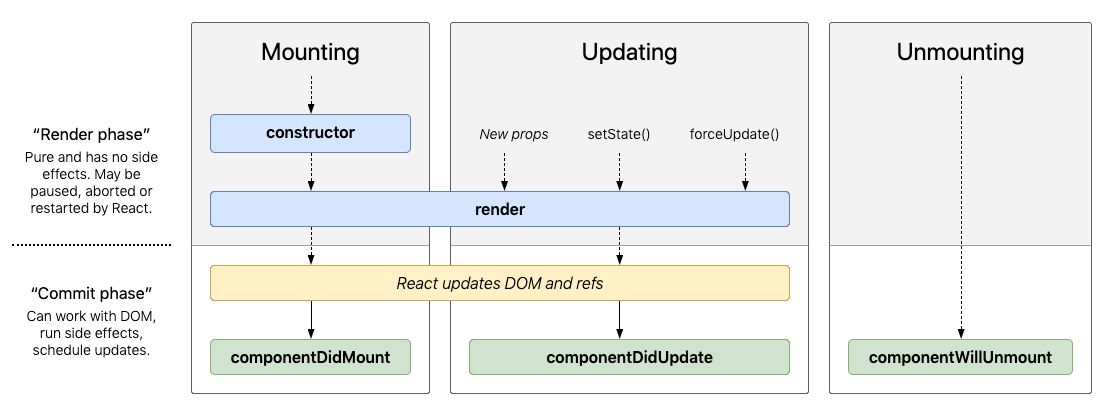
- Intro to component lifecycle
Preview
Basic React Concepts
import React from "react"

class App extends React.Component {
  state = { name: "Chris" }

// lifecycle methods

  render() {
    return (
     <p>{this.state.name}</p>
    )
  }
}
class
<App />- Contains local state
- Lifecycle methods
Basic React Concepts
import React from "react"

class App extends React.Component {
  constructor(props) {
    super(props)
    this.state = {
      name: "Chris"
    }
  }

  render() {
    return(
      <p>{this.state.name}</p>
    )
  }
}
Creating state
Using constructor to declare state
Basic React Concepts
import React from "react"

class App extends React.Component {
  state = { name: "Chris" }

  updateName = () => {
    this.setState({ name: "Amanda" })
  }

  render() {
    return(
      <div>
        <p onClick={this.updateName}>
          {this.state.name}
        </p>
      </div>
    )
  }
}
Updating state with
- Component needs to be re-rendered with the updated state
setState
- Enqueues changes to the component state
Basic React Concepts
Frequently Used React Lifecycle methods
code
Kid Counter
Function Component
Hooks!

Hooks!
- Lets you use state and other React features without writing a class
- Functions that let you “hook into” React state and lifecycle features from function components
- Don’t work inside classes — they let you use React without classes
useState()
- Allows you to use state in a functional component
- Can declare only one state variable at a time
- Able to set an initial state as an argument
- Use array destructuring to retrieve the value and setter
const [count, setCount] = useState(0)How does it work???

It's just closures...
function useState(initialValue) {

  let _val = initialValue      // _val is a local variable created by useState

  function state() {           // state is an inner function, a closure
    return _val
  }

  function setState(newVal) {  // setState is also a closure
    _val = newVal
  }

  return [state, setState]     // exposing functions for external use
}

const [foo, setFoo] = useState(0) // using array destructuring

console.log(foo())   // 0 - the initialValue we gave

setFoo(1)            // sets _val inside useState's scope

console.log(foo())   // 1 - new initialValue, despite exact same call
...and arrays
const MyReact = (function() {
  let hooks = [],
      currentHook = 0 // array of hooks, and an iterator!

  return {
    render(Component) {
      const Comp = Component() // run effects
      Comp.render()
      currentHook = 0 // reset for next render
      return Comp
    },

    useState(initialValue) {
      hooks[currentHook] = hooks[currentHook] || initialValue
      const setStateHookIndex = currentHook // for setState's closure!
      const setState = newState => (hooks[setStateHookIndex] = newState)
      return [hooks[currentHook++], setState]
    }
  }
})() // MyReact is an IIFE (moar closures!!!)
code
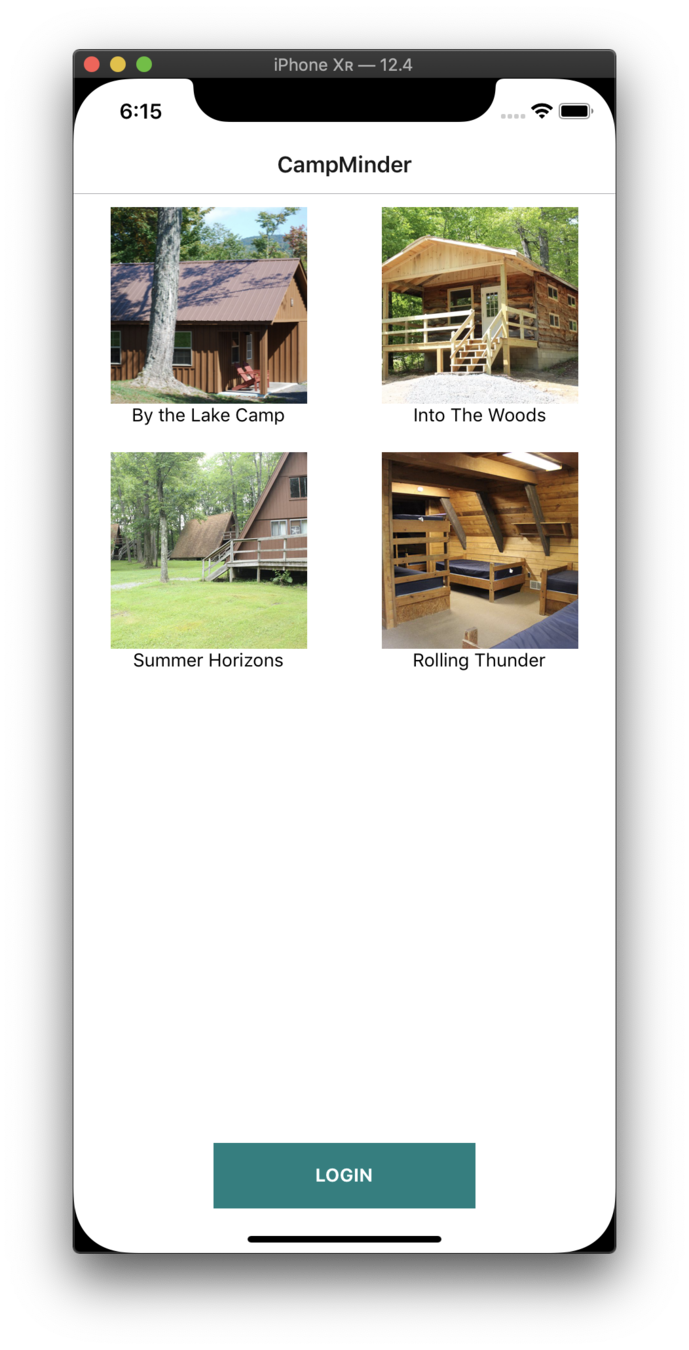
Create a list of camps
map()
- Creates a new array
- With the results of calling a provided function
- On every element in the calling array.
map()
[1, 2, 3]
Array →
[1, 2, 3].map()
.map() →
[1, 2, 3].map((item) => item)
.map() →
[1, 2, 3].map((item, index) => item + index)
.map() →
[1, 2, 3]
returns →
[1, 3, 5]
returns →
map()
const items = [{name: "Nick"}, {name: "Bill"}, {name: "Steve"}]
items.map((item) => ?)
Bill
Nick
Steve
items.map((item) => <p>{item.name}</p>)

code
Create a CampDetailsScreen
Make new component in App.js and export it
export default App // currently exporting App


// 1) create new "Screen"
const CampDetailsScreen = () => {
  return (
    //  Your code Here
  )
}

// 2) export default the new screen - "CampDetailsScreen"


export default CampDetailsScreen // in App.js you should have this now

Build this on your own 👍🤞
Navigation
react-navigation
Navigation
npm i @react-navigation/web --save
Step 1: Install react-navigation
npm i @react-navigation/core --save
Navigation
createSwitchNavigator
Step 2: import createSwitchNavigator
// App.js

import { createSwitchNavigator } from "@react-navigation/core"
Navigation
createBrowserApp
Step 3: import createBrowserApp
// App.js

import { createBrowserApp } from "@react-navigation/web"
Navigation
Step 4: Create navigation screens using components
import { HomeScreen } from "./screens/HomeScreen"
import { InfoScreen } from "./screens/InfoScreen"

...

const MyHomeRoutes = createSwitchNavigator(
  {
    Home: HomeScreen,          // routes
    Info: InfoScreen
  },
  { initialRouteName: "Info" } // configuration
)
createSwitchNavigator takes 2 arguments:
Navigation
Step 5: Render Navigation
// in App.js

...

const AppNavigator = createSwitchNavigator({
  camps: CampListScreen,
  camp: CampDetailsScreen,
})

const App = createBrowserApp(AppNavigator)

export default App
code
Make Components
-
<Tile/> - CampListScreen
-
<Header/> - App-wide
-
<Footer/> - App-wide

Login Screen

Login Screen
- Controlled vs uncontrolled component
- Toggle password visibility with useRef

code
Registration Screen

localStorage
💾
localStorage
Main methods:
-
setItem
-
clear
-
getItem
-
removeItem
localStorage
Main methods:
-
setItem("key", "value")
-
clear()
-
getItem("key")
-
removeItem("key")
code
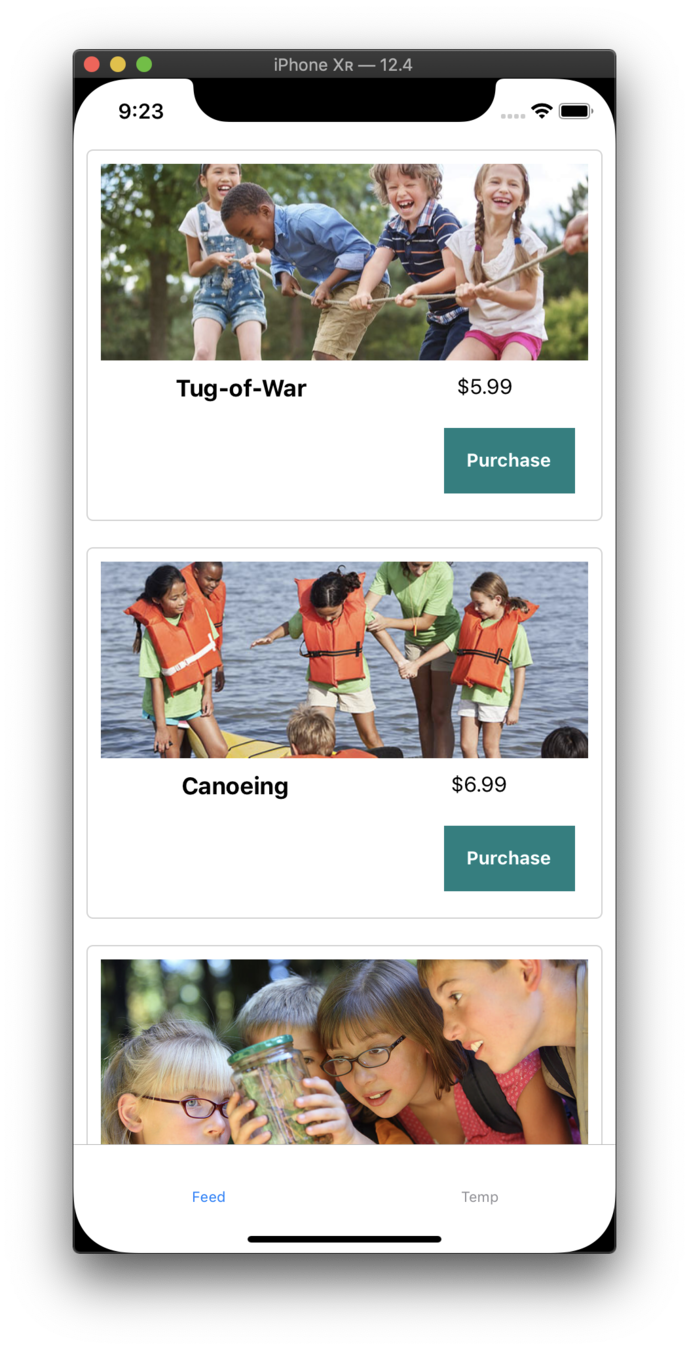
Feed Screen

withNavigation HOC
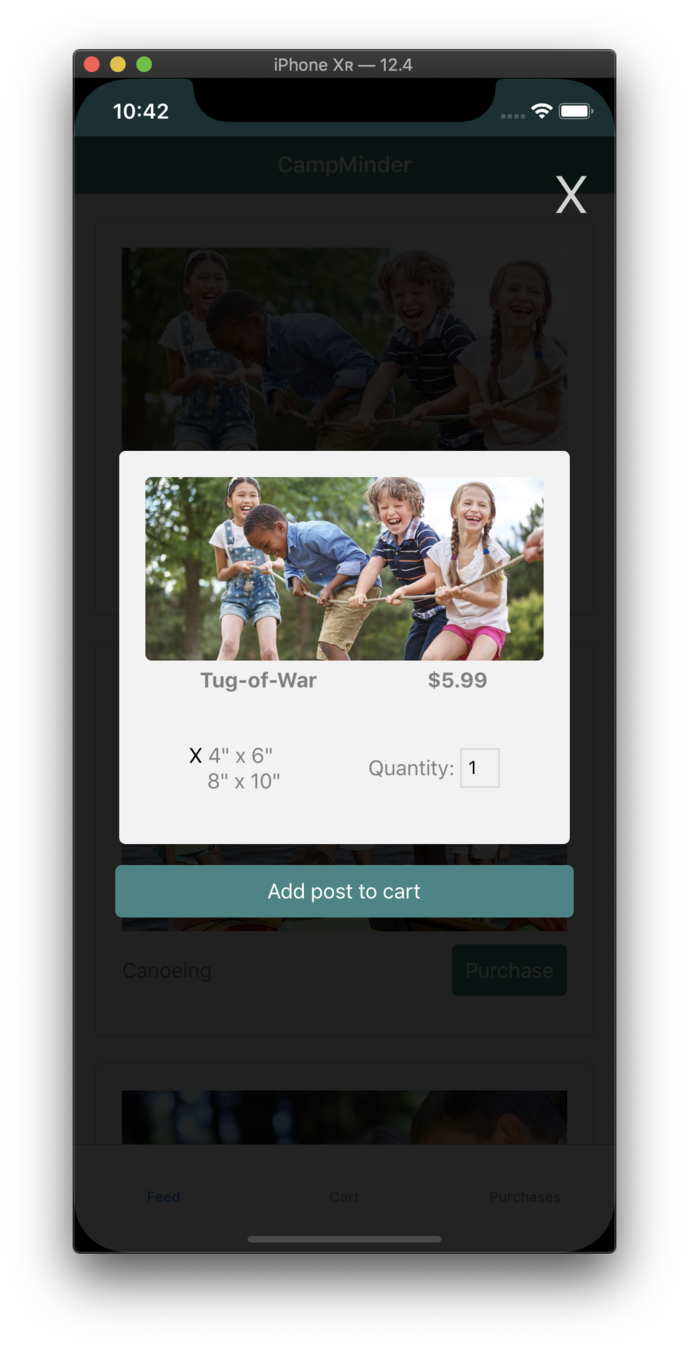
Post Modal

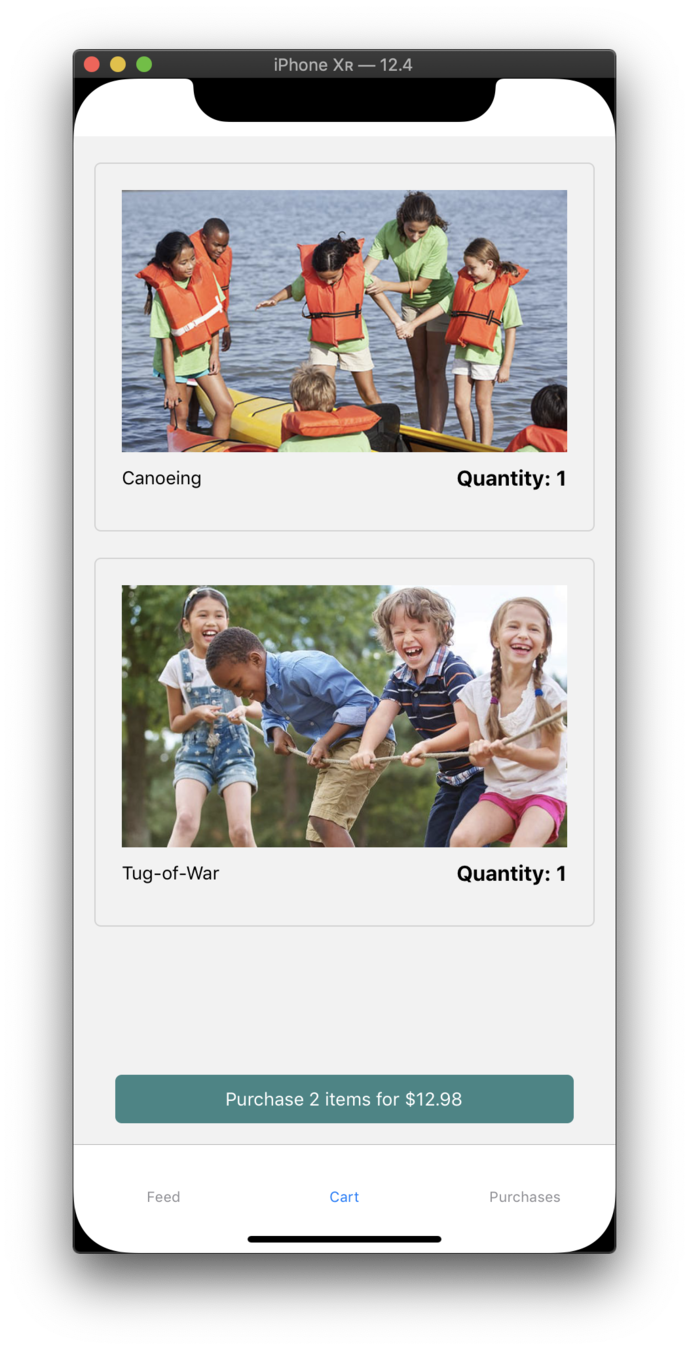
Cart Screen

MobX State Tree
MST
Overview
-
Opinionated - How data should be structured and updated
-
Typed — Includes its own typed API
-
Models — You build trees of models
MST
Common typings of types:
- types.string
- types.number
- types.boolean
- types.array(type)
MST
Uses Observers
- Page/Screen
- observe/listen/subscribe to MST state
- facilitates state changes in MST state
Observers allow:
MST
Setup model (store)
import { types } from "mobx-state-tree"

const RootStore = types.model({
  userId: types.string
})

...
MST
Add some actions
import { types } from "mobx-state-tree"

const RootStore = types.model({
  userId: types.string
})
.actions(self => ({
  setUserId(id) {
    self.userId = id
  }
}))


...
MST
Create the store!
import { types } from "mobx-state-tree"

const RootStore = types.model({
  userId: types.string
})
.actions(self => ({
  setUserId(id) {
    self.userId = id
  }
}))


export const store = RootStore.create()
Context API
- Alternative to prop drilling
- Designed to share data that can be considered “global” for a tree of React components
const defaultValue = "so contextual"
// create the context
const MyContext = React.createContext(defaultValue)
// provide in a top level component
render() {
return (
<MyContext.Provider value={"so contextual"}>
{children}
</MyContext>
)
}
// use in a component
const context = useContext(MyContext)
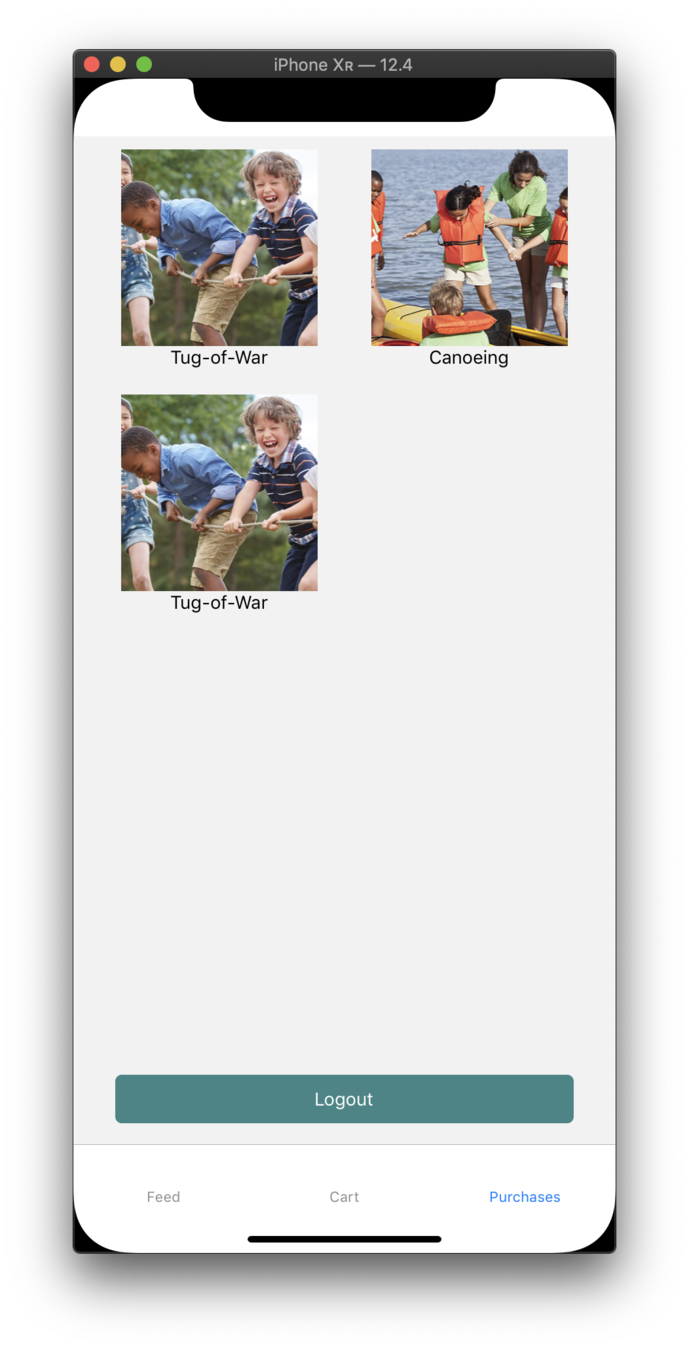
context === "so contextual"Purchases Screen
Testing

Unit Tests
Test individual parts (e.g. functions, objects) to ensure they interface and work as expected
Characteristics of good unit tests
- Free of dependencies or side effects
- Fast
- Thorough
- Well factored
Component Tests
Test individual React components apart from where they are used in the application
- Create an instance of the component
- Pass it different props
- Interact with it and see how it behaves
Snapshot Tests
Test that components have not changed by comparing snapshots of the React tree
- Quickest and easiest tests to write
- Break frequently
- Easy to update
- Need to be written after implementation (i.e. no TDD)
- Powerful in combination with Storybook
End-to-End Tests
Test your entire application the way a user would, simulating clicks and checking for components on the screen
- Provide the greatest confidence that your application is working as expected
- Slow
- Difficult to write and maintain
- Test failures are often difficult to diagnose
code
Next Steps
Be Free!

Next Steps
-
show subtotals and totals for purchases
-
actually protect routes
-
change price based on size
-
highlight active route in nav bar
-
better styles
-
animations
-
write more tests
React Native
Let's Shift Gears

Main Differences
- JSX - TitleCased vs lowercase & imported
- FlatList vs map - list components
- ScrollView - required to scroll
- Navigation - stack & tab navigators
- FlexBox - used by default
- AsyncStorage vs localStorage
React Native Core Components
-
View
-
ScrollView
-
Text
-
TextInput
-
Image
-
TouchableOpacity
React vs React Native
| React | React Native |
|---|---|
| <div> | <View> |
| <p> | <Text> |
| <input /> | <TextInput /> |
| <button> | <TouchableOpacity /> |
Styling
Styles can be created one of three ways:
- inline
- object
- StyleSheet declaration
Styling
StyleSheet
import { StyleSheet, View, Text } from "react-native"

...

const styles = StyleSheet.create({
  container: {
    width: 300,
    height: 130
  },
  text: {
    color: "red"
  }
})

...

<View style={styles.container}>
  <Text style={styles.text}>Hello World</Text>
</View>
StyleSheet.create({...})
Expo App

CampsListScreen
FlatList
FlatList
...

render() {
  const data = [
    { key: "Chris" },
    { key: "Amanda" }
  ]

  return (
    <View>
      <FlatList
        data={data}
        renderItem={({ item }) =>
          <Text>{item.key}</Text>}
      />
    </View>
  )
}
Requires 2 props:
-
data
-
renderItem
[ ]
({item}) => { }
FlatList
...

render() {
  const data = [
    { name: "Chris" },
    { name: "Amanda" }
  ]

  renderItem = ({ item }) => {
    return <Text>{item.name}</Text>
  }

  return (
    <View>
      <FlatList
        data={data}
        renderItem={this.renderItem}
        keyExtractor={item => item.name}
      />
    </View>
  )
}
keyExtractor
- Key is used for caching
- To track item re-ordering
FlatList
...

render() {
  const data = [
    { name: "Chris" },
    { name: "Amanda" }
  ]

  renderItem = ({ item }) => {
    return <Text>{item.name}</Text>
  }

  return (
    <View>
      <FlatList
        data={data}
        renderItem={this.renderItem}
        keyExtractor={item => item.name}
        ItemSeparatorComponent={() => <View />}
      />
    </View>
  )
}
ItemSeparatorComponent
FlatList
...

render() {
  const data = [
    { name: "Chris" },
    { name: "Amanda" }
  ]

  renderItem = ({ item }) => {
    return <Text>{item.name}</Text>
  }

  return (
    <View>
      <FlatList
        data={data}
        renderItem={this.renderItem}
        keyExtractor={item => item.name}
        refreshing={this.state.refreshing}
        onRefresh={this.onRefresh}
      />
    </View>
  )
}
onRefresh
code
CampDetailsScreen
React Navigation in React Native
Navigation
react-navigation
The community solution to navigation is a standalone library that allows developers to set up the screens of an app with just a few lines of code
Navigation
Main types of navigators:
StackNavigator
SwitchNavigator
TabNavigator
DrawerNavigator
Navigation
npm i react-navigation --save
Step 1: Install react-navigation
yarn add react-navigation
or
Navigation
npm i react-native-gesture-handler --save
Step 1a: Install react-native-gesture-handler
yarn add react-native-gesture-handler
or
Navigation
Step 1b: Link react-native-gesture-handler
react-native link react-native-gesture-handler
Navigation
createStackNavigator
Step 2: import createStackNavigator
import { createStackNavigator } from "react-navigation"Step 3: import createAppContainer
import { createStackNavigator, createAppContainer } from "react-navigation"Navigation
createAppContainer
- Containers are responsible for managing your app state and linking your top-level navigator to the app environment
- On Android, the app container uses the Linking API to handle the back button
- The container can also be configured to persist your navigation state
- Props of createAppContainer
Navigation
Step 4: Create navigation screens using components
const MyHomeRoutes = createStackNavigator({
  Home: { screen: Home },
  Info: { screen: Info }
},{
  initialRouteName: "Home"
  }
})- StackNavigatorConfig: object
- RouteConfigs: object
createStackNavigator takes 2 arguments:
Navigation
StackNavigator - Basic Implementation
const Home = () => (
  <Text>Hello from Home</Text>
)

const Info = () => (
  <Text>Hello from Info</Text>
)

const AppStack = StackNavigator({
  Home: { screen: Home },
  Info: { screen: Info }
})

const App = createAppContainer(AppStack)

AppRegistry.registerComponent("App", () => App)
code
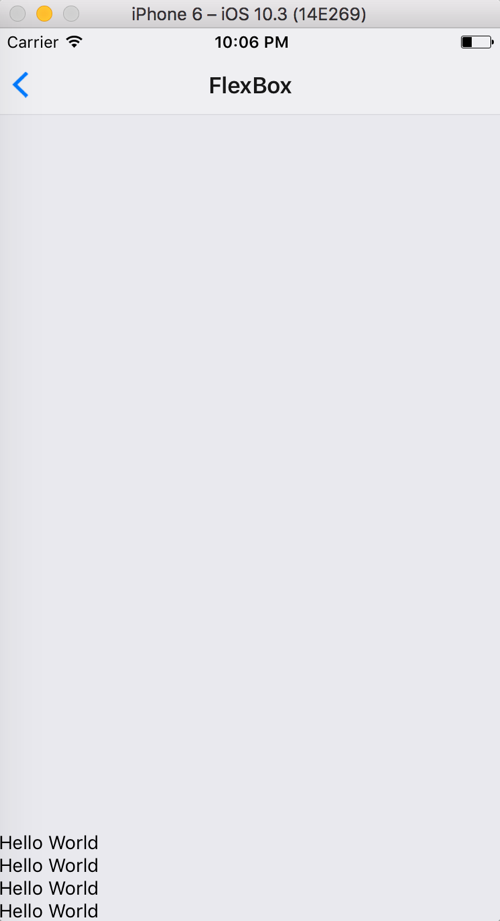
FlexBox
FlexBox
A component can specify the layout of its children using the flexbox algorithm. Flexbox is designed to provide a consistent layout on different screen sizes.
You will normally use a combination of:
-
flexDirection
-
alignItems
-
justifyContent
to achieve the right layout.
FlexBox
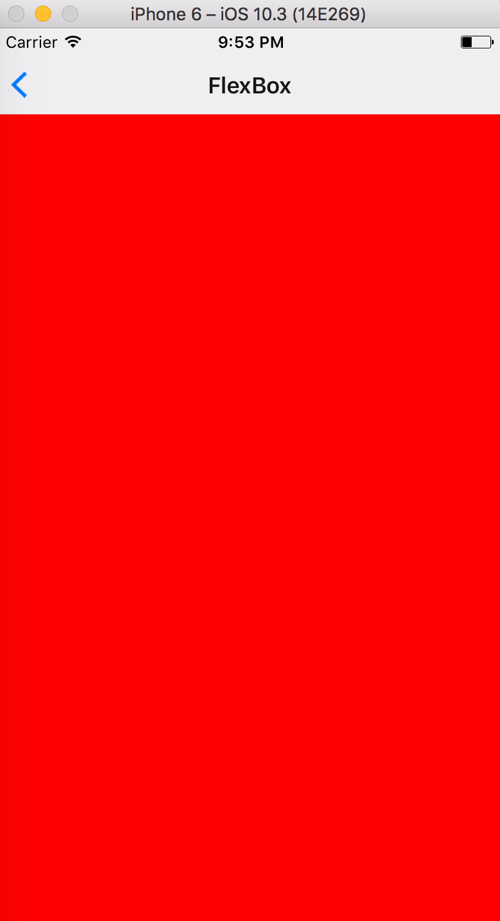
flex: number
container: {
  flex: 1
},
box1: {
  flex: 1,
  backgroundColor: 'red'
},
<View style={styles.container}>
<View style={styles.box1} />
</View>FlexBox
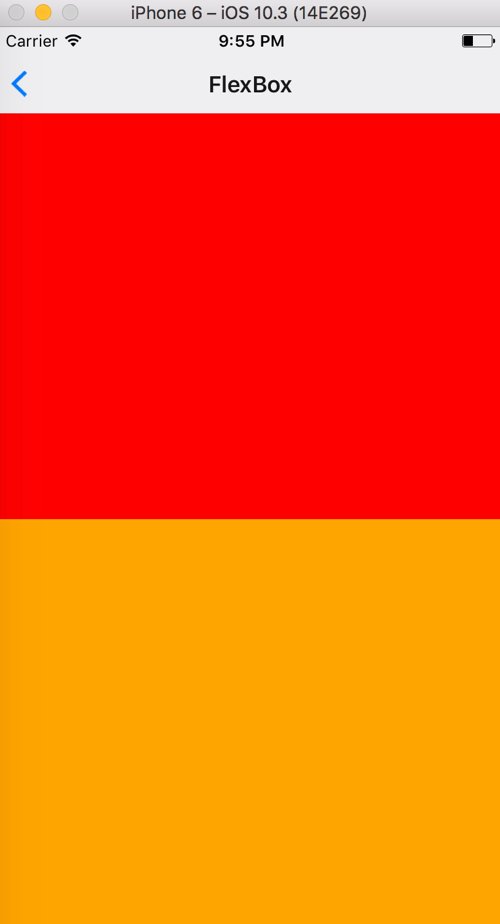
flex: number
container: {
  flex: 1
},
box1: {
  flex: 1,
  backgroundColor: 'red'
},
box2: {
  flex: 1,
  backgroundColor: 'orange'
},
<View style={styles.container}>
<View style={styles.box1} />
<View style={styles.box2} />
</View>FlexBox
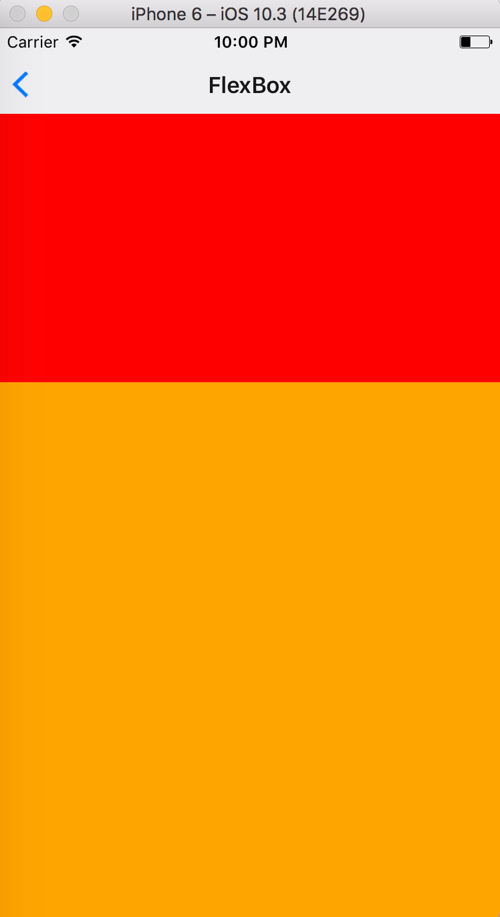
flex: number
container: {
  flex: 1
},
box1: {
  flex: 1,
  backgroundColor: 'red'
},
box2: {
  flex: 2, // "Change flex from 1 to 2"
  backgroundColor: 'orange'
},
<View style={styles.container}>
<View style={styles.box1} />
<View style={styles.box2} />
</View>FlexBox
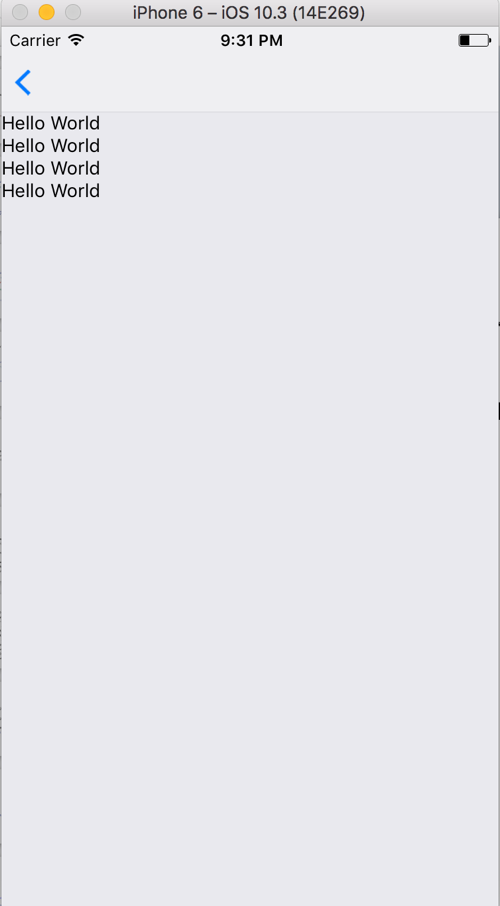
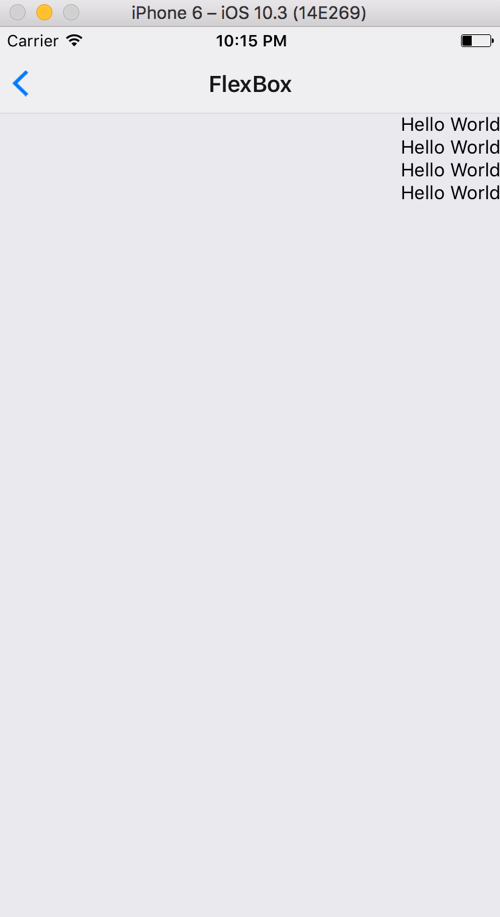
flexDirection
container: {
  flex: 1
}
<View style={styles.container}>
<Text>Hello World</Text>
<Text>Hello World</Text>
<Text>Hello World</Text>
<Text>Hello World</Text>
</View>- defines primary axis
- default is column
- column
FlexBox
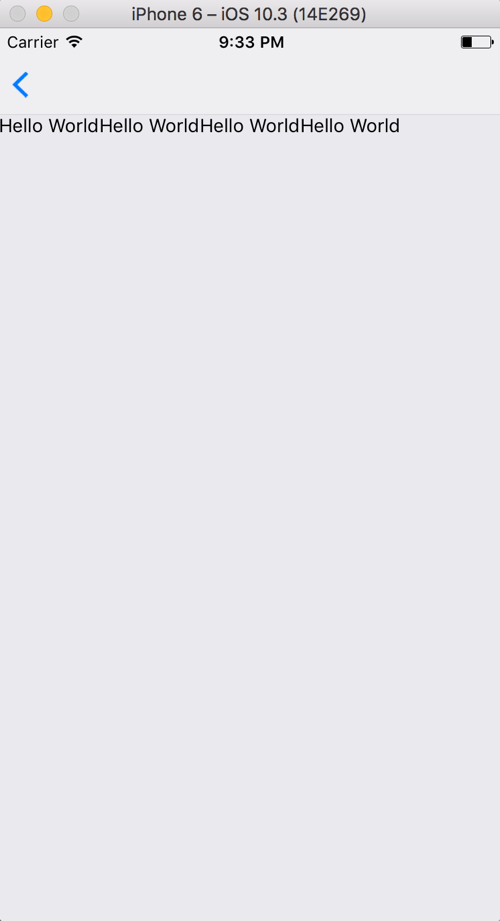
flexDirection
container: {
flex: 1,
flexDirection: 'row'
}<View style={styles.container}>
<Text>Hello World</Text>
<Text>Hello World</Text>
<Text>Hello World</Text>
<Text>Hello World</Text>
</View>- row
FlexBox
justifyContent
Determines the distribution of children along the primary axis.
flexDirection: column
flexDirection: row
⬆
⬇
⬅ ➡
FlexBox
justifyContent:
- flex-start
- center
- flex-end
- space-around
- space-between
FlexBox

justifyContent:
<View style={styles.container}>
  <Text>Hello World</Text>
  <Text>Hello World</Text>
  <Text>Hello World</Text>
  <Text>Hello World</Text>
</View>'center'
container: {
flex: 1,
justifyContent: 'center'
}
container: {
flex: 1,
justifyContent: 'flex-end'
}
container: {
flex: 1
}
'flex-end'
container: {
flex: 1,
justifyContent: "space-around"
}
'space-around'
container: {
flex: 1,
justifyContent: "space-between"
}
'space-between'
FlexBox
alignItems
Determines the distribution of children along the secondary axis.
flexDirection: column
⬆
⟷
⬇
⬅ ↕ ➡
alignItems: center
flexDirection: row
alignItems: center
Default - 'stretch'
horizontal axis
vertical axis
FlexBox

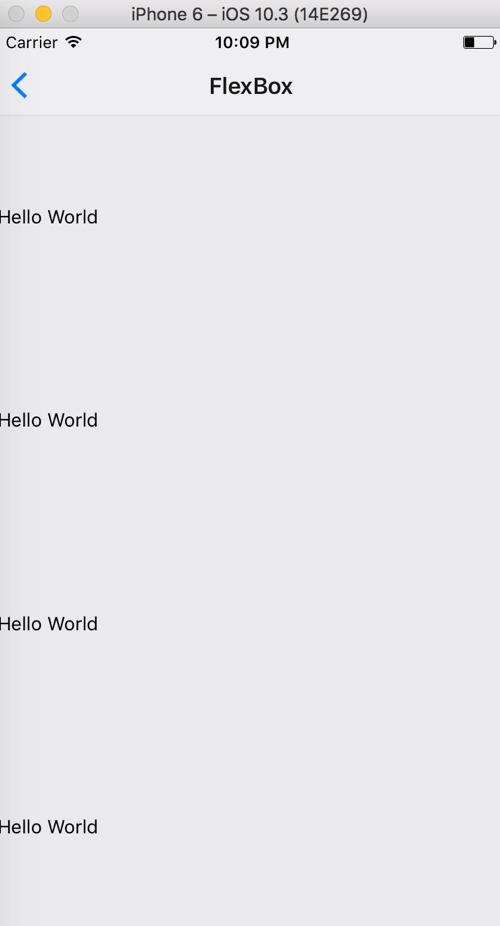
alignItems:
container: {
flex: 1,
alignItems: 'center'
}'center'
in action
'flex-end'
<View style={styles.container}>
  <Text>Hello World</Text>
  <Text>Hello World</Text>
  <Text>Hello World</Text>
  <Text>Hello World</Text>
</View>container: {
flex: 1,
alignItems: 'flex-end'
}
exercise
training.infinite.red
Login Screen
Login Screen
- Just like React
- Use <TextInput/> instead of <input>

code
Tab Navigator
Tab Navigator
createBottomTabNavigator
import createBottomTabNavigator
import { createBottomTabNavigator } from "react-navigation"Tab Navigator
Create Tab routes using screens or other navigators
const Tabs = createBottomTabNavigator(
  {
    Home: HomeScreen,
    Input: InputScreen
  },
  {
    initialRouteName: "Home",
    tabBarOptions: {
      activeBackgroundColor: "orange",
      inactiveBackgroundColor: "yellow"
    }
  }
)
- BottomTabNavigatorConfig: object
- RouteConfigs: object
createBottomTabNavigator can also take 2 arguments:
code
Feed Screen
Feed
Screen
MST
Adding MST
npm i mobx mobx-react mobx-state-tree --saveAdding MST
npm i mobx mobx-react mobx-state-tree --saveMST
Pass along data/actions from a named store
inject
inject("rootStore")MST
Make the screen pay attention to the store
observer
inject("rootStore")(observer(YourScreen))code
Modal
Modal
Useful props:
-
animationType - String
- "slide"
- "fade"
- "none"
- transparent - Boolean
- visible - Boolean
Class
builds
Modal 🛠
Cart Screen
AsyncStorage
AsyncStorage
Main methods:
-
setItem
-
multiGet
-
getItem
-
multiSet
AsyncStorage
setItem(key: string, value: string, ?(error) => void)setItem
getItem(key: string, ?(error, result: ?string) => void)getItem
setItem("username", "FrankTheTank")getItem("username", (error, result) => console.log(error, result))AsyncStorage
multiSet(keyValuePairs: Array<Array<string>>, ?(errors) => void)multiSet
multiSet(
  [
    ["username", "FrankTheTank"],
    ["password", "password_snake_cased"]
  ],
  (errors) => console.log(errors)
)
AsyncStorage
multiGet(keys: Array<string>, ?(errors, result: Array<Array<string>>) => void)multiGet
multiGet(
  ["username", "password"],
  (errors, result) => console.log(result)
)

// [
//   ["username", "FrankTheTank"],
//   ["password", "password_snake_cased"]
// ]
code
Purchases Screen
Next Steps
-
add SignUpScreen
-
show subtotals and totals for purchases
-
actually protect routes
-
change price based on size
-
highlight active route in nav bar
-
better styles
-
animations
-
write more tests
Campminder Training
By Infinite Red


