WIFI
matrix-conference
portland
React Native Fundamentals
WELCOME FRIENDS!
Welcome
Connect
community.infinite.red
#CR-fundamentals-2019
Morning
8:00 - 8:30am
8:30 - 9:00am
9:00 - 9:30am
11:30 - 12:00pm
9:30 - 10:00am
Welcome
React Philosophy - ES6 - JSX
Hello World Basics - passing props
Play with components
10:00 - 10:30am
BREAK
Styles intro -💪Flex Yo Self exercises
10:30 - 11:00am
TextInput & managing local state
11:00 - 11:30am
More with state - buttons
🍽 LUNCH 🍽
12:00pm-1:00pm
Afternoon
1:00 - 1:15pm
1:45 - 2:00pm
Panel
2:30 - 3:00pm
Lists
2:00 - 2:30pm
State Management & useReducer
3:00 - 3:30pm
Componentize your life
3:00 -3:30pm
BREAK
3:30 - 4:00pm
Navigation
4:00 - 5:00pm
AsyncStorage - Wrap up - Questions - Misc
Context API & useContext hook
1:15 - 1:45pm
Let's talk about hooks, baby!
Let Us Meet You
-
What is your name?
-
Where are you from?
-
Programming background?
- Outside of programming, what do you enjoy?
Frank
von Hoven
-
Senior Software Engineer
-
React Native Newsletter
- Editor-in-Chief


Ryan Linton
-
Señor Software Engineer
-
Master of the Serious

React Native Philosophy
The React Story

What is React?
- UI as a function of state
- React virtual DOM, React Fiber
- By Facebook
What is React Native?
- Based on ReactJS
- Multiple Platforms
- "Learn once, write anywhere"
Software Goals
- Reusable
- Predictable
- Testable
- Scalable
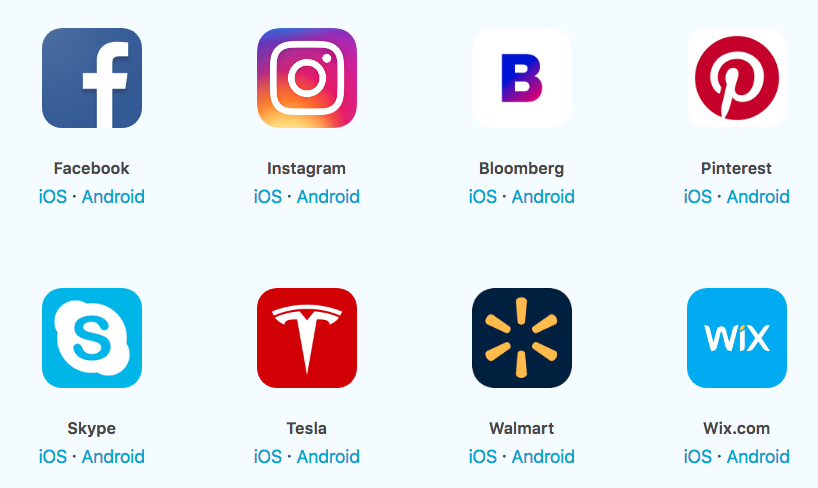
Who Uses React Native?
Declarative
- Flexible
- Predictable
- Easier to debug
Declarative Code
- Imperative response:
- Go out of the north exit of the parking lot and take a left.
- Get on I-15 North until you get to the 12th street exit.
- Take a right off the exit like you’re going to Ikea.
- Go straight and take a right at the first light.
- Continue through the next light then take your next left.
- My house is #123.
“I’m right next to Wal-Mart. How do I get to your house from here?"
- Declarative response:
- My address is 123 Happy St., Portland, OR 97035
“I’m right next to Wal-Mart. How do I get to your house from here?"
Composability
- Small reusable components
- Combine components into "screens"
- Screens into App
ES6
ES6
New variable types
let
const
var
X
99% of the time
ES6
Arrow functions: ( ) => { }
ES5
ES6
binds function to
var sayName = function() { }const sayCity = () => { }() => { }thisthis.sayName.bind(this)this.sayCity()ES6
const getName = (name) => {
  return name
}
Functions - explicit vs implicit
var getName = function(name) {
  return name
}
ES5
ES6
const getName = (name) => nameEXPLICIT
IMPLICIT - only with
const getName = (name) =>
namereturn
Implicit === No { } required
ES6
ES6
const sayName = (name) => console.log(name)Arrow Function Parameters
const sayName = name => console.log(name)const addTwo = (a, b) => console.log(a + b)1 Parameter
( ) are optional
2+ Parameters
( ) are required
ES6
Object { destructuring }
const { name, hair } = person
const person = {
  name: 'James',
  hair: 'Brown',
  height: "6'1"
}
// "James", "Brown"console.log(name, hair)
ES6
Spread operator
console.log(person)
Spread an object
...const employment = {
company: 'Infinite Red',
job: 'Software Engineer'
}
const basicInfo = {
  firstName: 'Ryan',
  lastName: 'Linton'
}
const person = {
  ...basicInfo,
  ...employment,
  food: 'Tacos',
  movies: 'Comedy'
}
console.log(person)

{
  firstName: 'Ryan',
  lastName: 'Linton',
  company: 'Infinite Red',
  job: 'Software Engineer',
  food: 'Tacos',
  movies: 'Comedy'
}
const person = {
  ...basicInfo,
  ...employment,


}
const person = {
  ...basicInfo,


}
const person = {
  ...basicInfo,
  ...employment,
  food: 'Tacos',

}
JSX
JSX
- JSX adds XML-like syntax to JavaScript.
- Can use React Native without JSX.

JSX
This:
Compiles to:
<Text color="blue">
  Click Me
</Text>
React.createElement(
Text,
{color: 'blue'},
'Click Me'
)
React.createElement(
  type,
  [props],
  [...children]
)
createElement
Signature:
What makes this possible?
Babel is a JavaScript compiler
Babel
See it in action:
JSX vs. HTML
<View>
  <Text>Hello World</Text>
</View>
<button onclick="myFunction()"><div>
<p>Hello World</p>
</div><input type="text"><TextInput /><TouchableOpacity onPress={myFunction()} />Embedding Expressions into JSX
const person = { name: ‘Chris’, age: 22 }<View>
<Text>Hello { person.name }</Text>
</View>// "Hello Chris"JSX Children
<View>
  <Text>Hello!</Text>
  <Text>Good to see you here.</Text>
</View>
JSX
- HTML/XML-like structure in the same file as our JS code
- JSX is transformed into actual JS code (via Babel)
- tl;dr → JSX === Syntactic sugar
Candy Time!
JavaScript XML
- For a candy, JSX stands for...


Hello World 🌎
Hello World
- React Native Core Components
- Get app running
- Examine structure
- Create functional component
- Pass props
Preview
React Native Core Components
-
View
-
ScrollView
-
Text
-
TextInput
-
Image
-
TouchableOpacity
React Native vs HTML
| HTML | React Native |
|---|---|
| <div> | <View> |
| <p> | <Text> |
| <input /> | <TextInput /> |
| <button> | <TouchableOpacity /> |
$ git clone git@github.com:infinitered/PackingList2019.git
$ cd PackingList2019

---------------------------

$ yarn

or

$ npm i

---------------------------

$ react-native run-ios

or

$ react-native run-android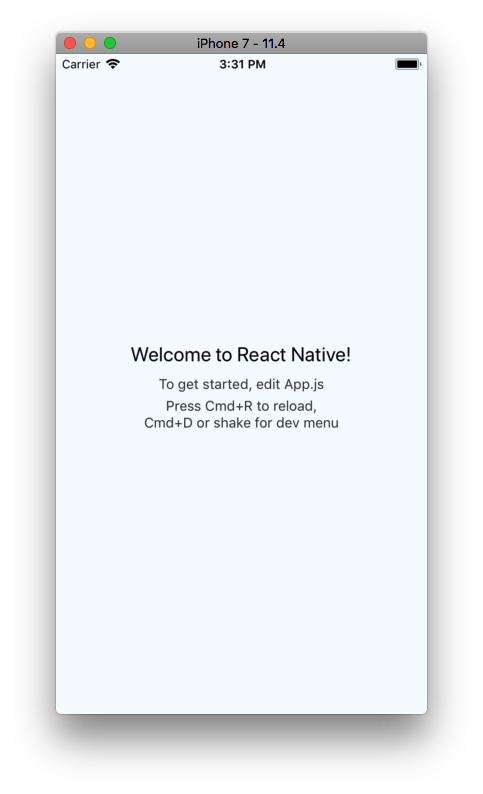
App.js
code
Hello World
- Get app running
- Examine structure
- Create functional component
- Pass props
Re-cap
Let's look at what comes with React Native...
Go crazy
- Take 15-20 min and explore components.
- Put your finished work in the workshop Slack channel.
- A winner will be chosen!

☕️ Break ☕️
Please return at 10:30am
Next Up:

Packing List App
Packing List App

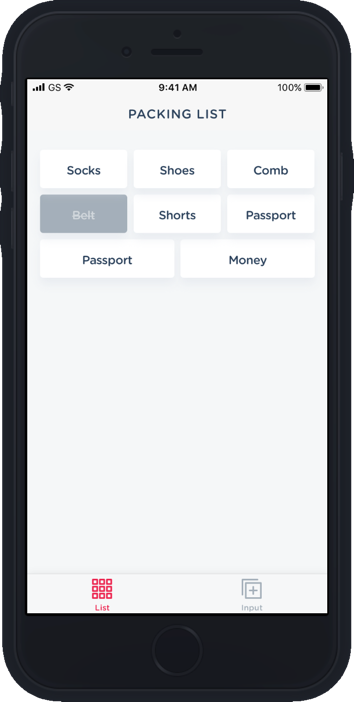
Local State
Lesson 1
- Able to write to and read from local state
- Introduce TextInput component
Preview
- Introduce local state
Basic React Native Concepts
import React from 'react'
import { Text } from 'react-native'

class App extends React.Component {
  constructor(props) {
    super(props)
    this.state = { name: 'Dog' }
  }

  render() {
    return(
      <Text>{this.state.name}</Text>
    )
  }
}
Creating state
Using constructor to declare state
Basic React Native Concepts
import React from 'react'
import { Text } from 'react-native'

class App extends React.Component {
  state = { name: 'Dog' }

  render() {
    return(
      <Text>{this.state.name}</Text>
    )
  }
}
Creating state
State using property initializers to declare state
Basic React Native Concepts - state
import React from 'react'
import { Text } from 'react-native'

class App extends React.Component {
  state = { name: 'Dog' }

// lifecycle methods

  render() {
    return (
     <Text>{this.state.name}</Text>
    )
  }
}
class
<App />- Contains local state
- Lifecycle methods
- State is data
- Private
- Fully controlled by component
Basic React Native Concepts
import React from 'react'
import { Text } from 'react-native'

class App extends React.Component {
  state = { name: 'Dog' }

  render() {
    return(
      <Text onPress={() => this.setState({ name: 'Cat' })}>
        {this.state.name}
      </Text>
    )
  }
}
Updating state with
-
Component needs to be re-rendered with the updated state
setState
-
Enqueues changes to the component state
code
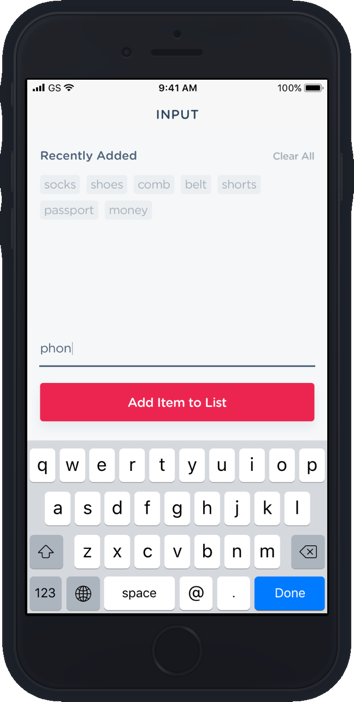
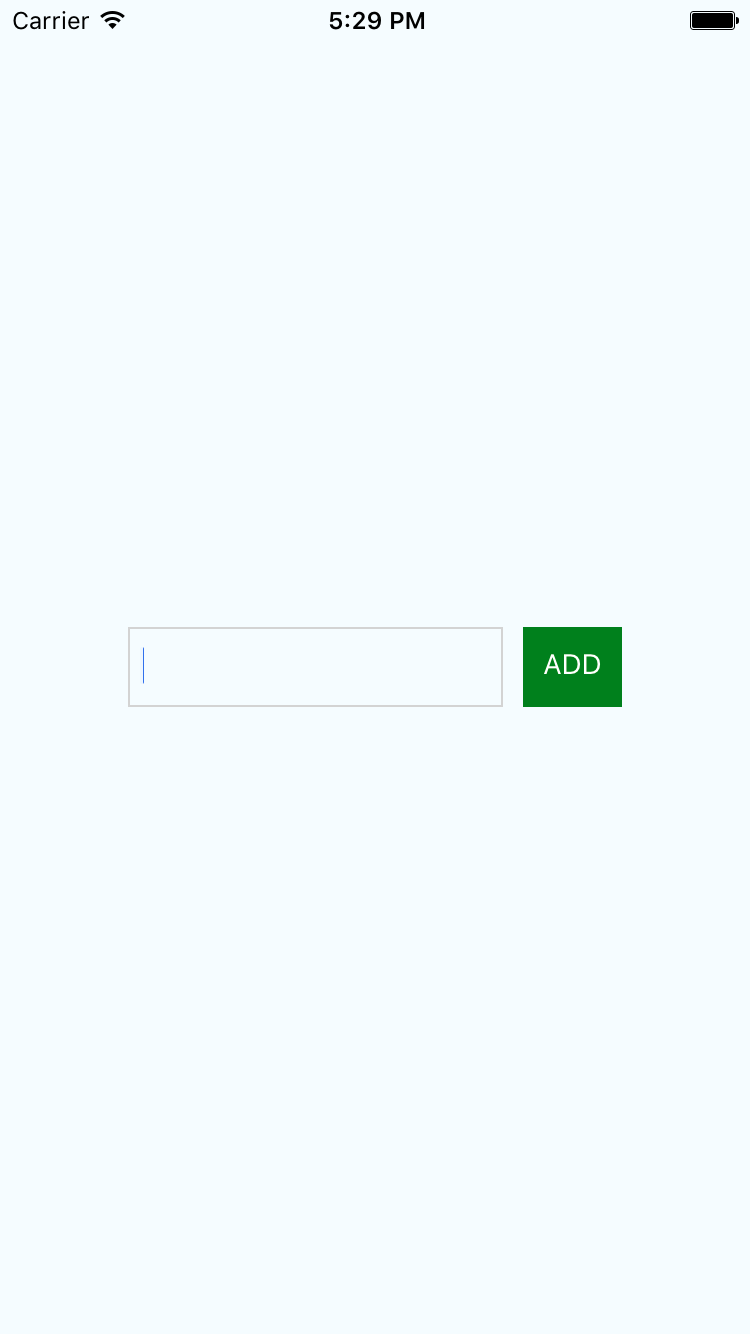
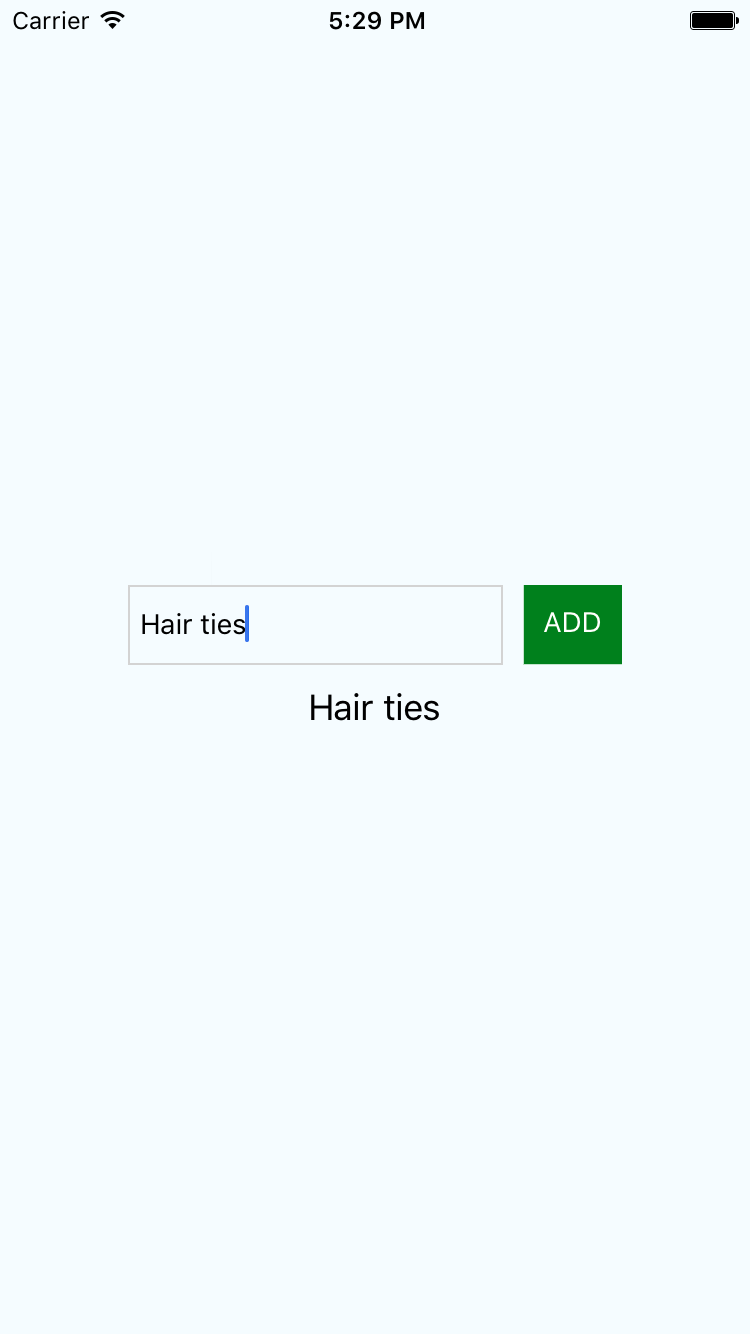
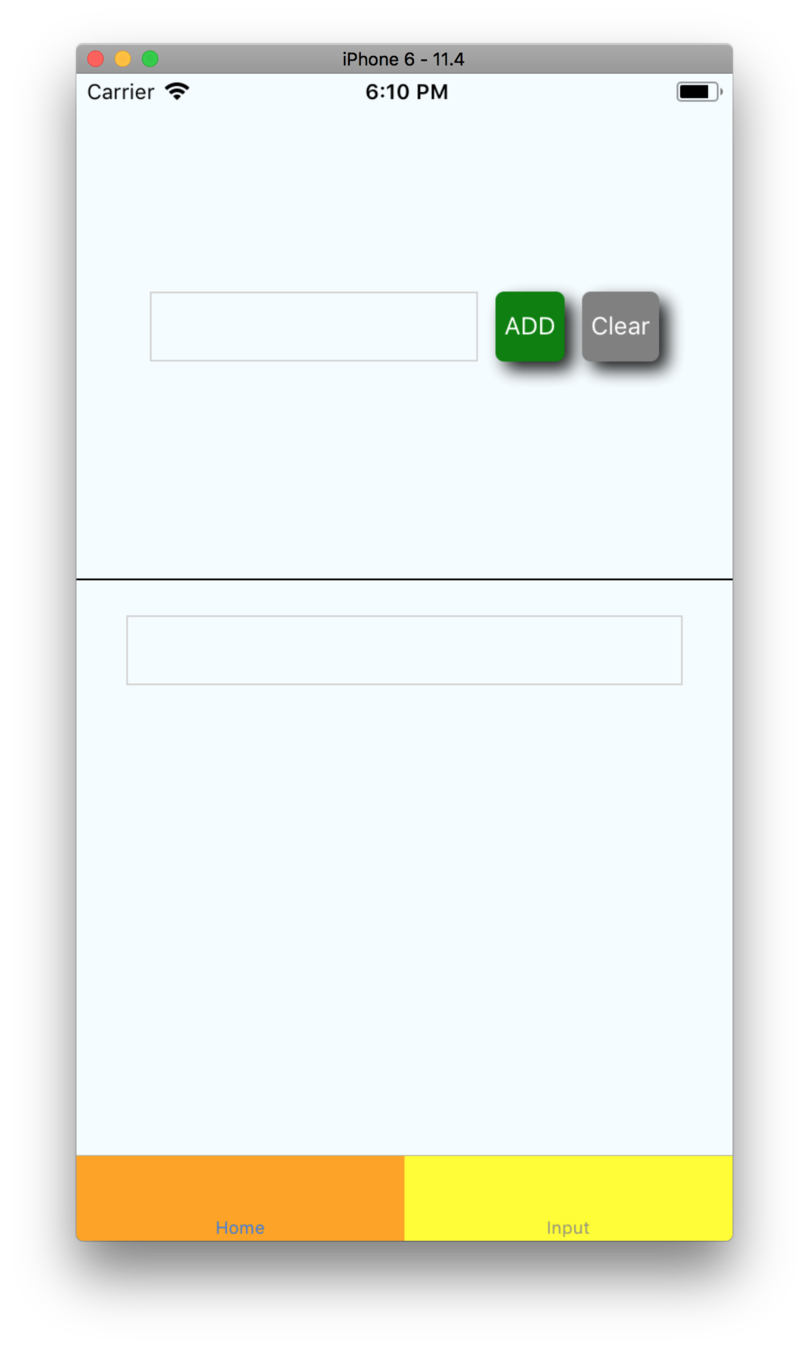
Button, Button, who's got the Button?
- Introduce "items" array into local state
Preview
- Able to add a new item into the items array
- Introduce TouchableOpacity
- Display items as a list
code
map()
- Creates a new array
- With the results of calling a provided function
- On every element in the calling array.
map()
[1, 2, 3]
Array →
[1, 2, 3].map()
.map() →
[1, 2, 3].map((item) => item)
.map() →
[1, 2, 3].map((item, index) => item + index)
.map() →
[1, 2, 3]
returns →
[1, 3, 5]
returns →
map()
{ items: ["Socks", "Shoes", "Jeans"] }
items.map((item) => ?)
Shoes
Socks
Jeans
items.map((item) => <Text>{item}</Text>)
Possible Options
- .concat()
- .push()
- ...
- .splice()
- .unshift()
- array[ i ]
Add a new item to the items array:
Buttons
Re-cap
- Introduce "items" array into local state
- Able to add a new item into the items array
- Introduce TouchableOpacity
- Display items as a list
Styling + Flexbox
Styling
Styles can be created one of three ways:
- inline
- object
- StyleSheet
Styling
inline styles
export App = () => {
  return (
    <View
      style={{
        width: 300,
        hight: 150,
        backgroundColor: "green"
      }}
    >
      <Text style={{ color: "red" }}>Hello</Text>
    </View>
  )
}
Styling
style object
const styles = {
  text: {
    color: "red"
  }
}

export App = () => {
  return <Text style={styles.text}>Hello World</Text>
}
Styling
StyleSheet
// ... imports ⬆︎

export class App extends Component {
  render () {
    return (
      <View style={styles.container}>
        <Text style={styles.text}>Hello World</Text>
      </View>
    )
  }
}

const styles = StyleSheet.create({
  container: {
    width: 300,
    height: 130
  },
  text: {
    color: "red"
  }
})
Styling
Array of styles
// ... imports ⬆︎

export class App extends Component {
  render () {
    return <Text style={[ styles.text, styles.bigText ]}>Hello</Text>
  }
}

const styles = StyleSheet.create({
  text: {
    color: 'red'
  },
  bigText: {
    fontSize: 30
  }
})
Styling
Combining inline styles with StyleSheet
// ... imports ⬆︎

export class App extends Component {
  render () {
    return (
      <Text style={[ styles.text, styles.bigText ]}>
        Hello
      </Text>
    )
  }
}

const styles = StyleSheet.create({
  text: {
    color: 'red'
  },
  bigText: {
    fontSize: 30
  }
})
// ... imports ⬆︎
export class App extends Component {
render () {
return (
<Text style={[ styles.text, styles.bigText, {} ]}>
Hello
</Text>
)
}
}
const styles = StyleSheet.create({
text: {
color: 'red'
},
bigText: {
fontSize: 30
}
})// ... imports ⬆︎
export class App extends Component {
render () {
return (
<Text style={[ styles.text, styles.bigText, { margin: 5 } ]}>
Hello
</Text>
)
}
}
const styles = StyleSheet.create({
text: {
color: 'red'
},
bigText: {
fontSize: 30
}
})Styling
Dynamic styling
// ... imports ⬆︎

export class App extends Component {
  state = { warning: true }

  render() {
    const fontColor = this.state.warning ? 'red' : 'black'
    return (
      <View>
        <Text style={{ color: fontColor }}>Hello World</Text>
      </View>
    )
  }
}
Styling
- Styles usually match CSS
- Prop names are camelCased
backgroundColor
background-color
vs
Styling
- width / height - number
- top / left / bottom / right - number
- padding - number
- margin - number
- borderWidth - number
- borderColor - color
Non-flex styles
<View/>
FlexBox
Flexbox is designed to provide a consistent layout on different screen sizes.
You will normally use a combination of:
-
flexDirection
-
alignItems
-
justifyContent
to achieve the right layout.
Who's used Flexbox
before today?
FlexBox
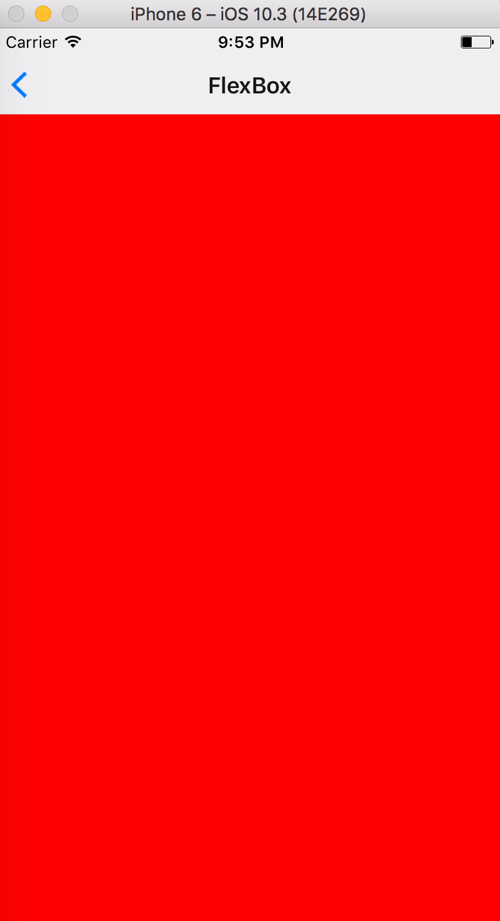
flex: number
container: {
  flex: 1
},
box1: {
  flex: 1,
  backgroundColor: 'red'
},
<View style={styles.container}>
<View style={styles.box1} />
</View>FlexBox
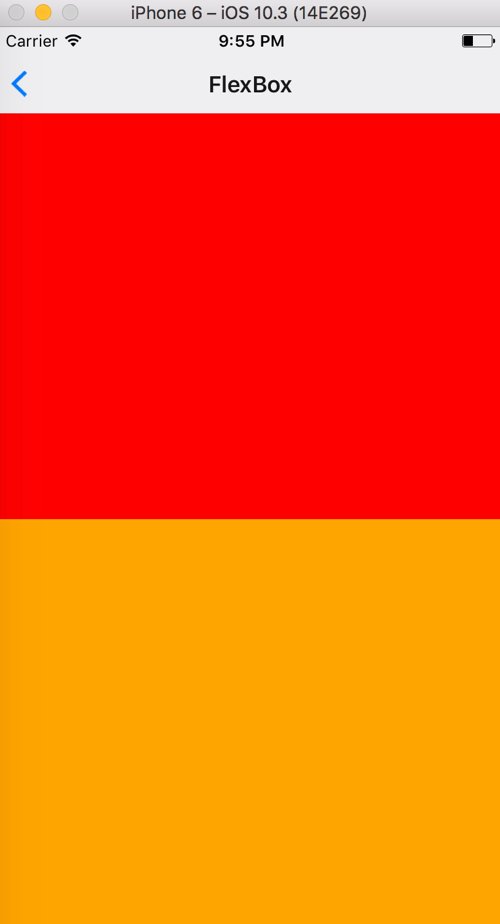
flex: number
container: {
  flex: 1
},
box1: {
  flex: 1,
  backgroundColor: 'red'
},
box2: {
  flex: 1,
  backgroundColor: 'orange'
},
<View style={styles.container}>
<View style={styles.box1} />
<View style={styles.box2} />
</View>FlexBox
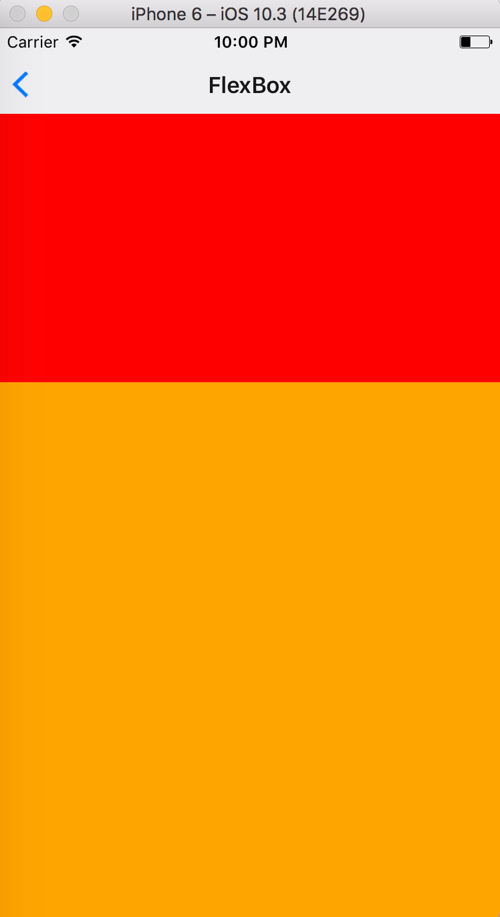
flex: number
container: {
  flex: 1
},
box1: {
  flex: 1,
  backgroundColor: 'red'
},
box2: {
  flex: 2, // "Change flex from 1 to 2"
  backgroundColor: 'orange'
},
<View style={styles.container}>
<View style={styles.box1} />
<View style={styles.box2} />
</View>FlexBox
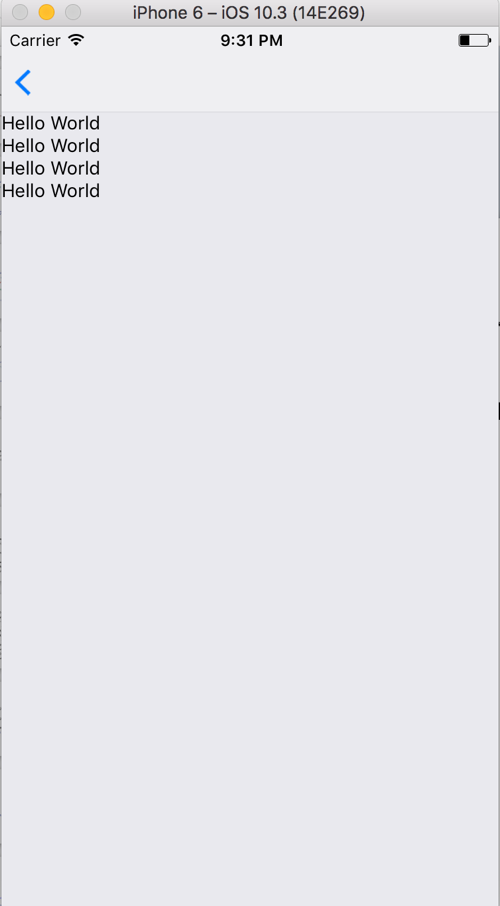
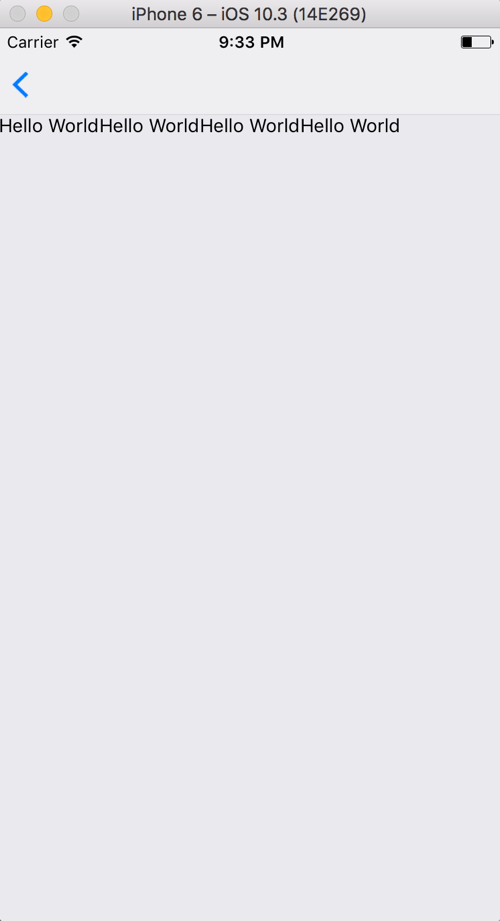
flexDirection
container: { flex: 1 }<View style={styles.container}>
<Text>Hello World</Text>
<Text>Hello World</Text>
<Text>Hello World</Text>
<Text>Hello World</Text>
</View>- defines primary axis
- default is column
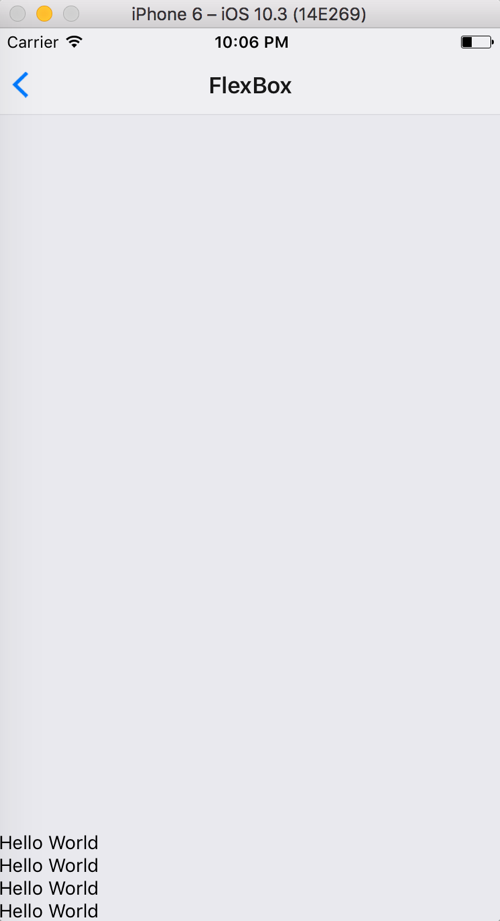
FlexBox
flexDirection
container: {
flex: 1,
flexDirection: 'row'
}<View style={styles.container}>
<Text>Hello World</Text>
<Text>Hello World</Text>
<Text>Hello World</Text>
<Text>Hello World</Text>
</View>- defines primary axis
- default is column
- row or column
FlexBox
justifyContent
Determines the distribution of children along the primary axis.
flexDirection: column
flexDirection: row
⬆
⬇
⬅ ➡
FlexBox
justifyContent:
- flex-start
- center
- flex-end
- space-around
- space-between
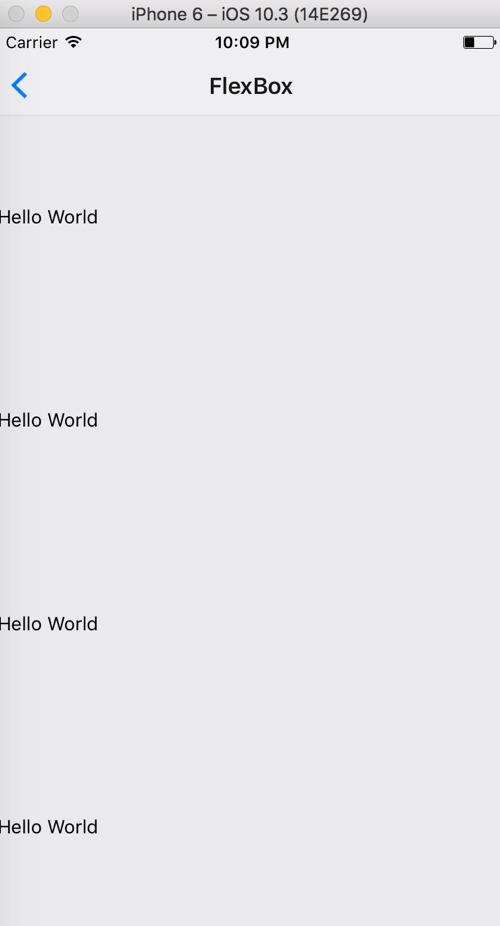
FlexBox

justifyContent:
container: {
flex: 1,
justifyContent: 'center'
}
<View style={styles.container}>
  <Text>Hello World</Text>
  <Text>Hello World</Text>
  <Text>Hello World</Text>
  <Text>Hello World</Text>
</View>'center'
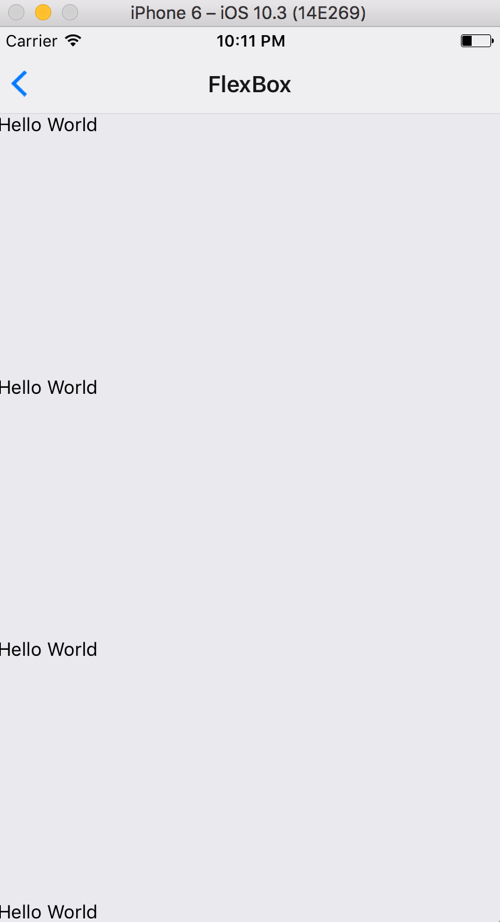
FlexBox
justifyContent:
container: {
flex: 1,
justifyContent: 'flex-end'
}
<View style={styles.container}>
  <Text>Hello World</Text>
  <Text>Hello World</Text>
  <Text>Hello World</Text>
  <Text>Hello World</Text>
</View>'flex-end'
FlexBox
justifyContent:
container: {
flex: 1,
justifyContent: 'space-around'
}
<View style={styles.container}>
<Text>Hello World</Text>
<Text>Hello World</Text>
<Text>Hello World</Text>
<Text>Hello World</Text>
</View>'space-around'
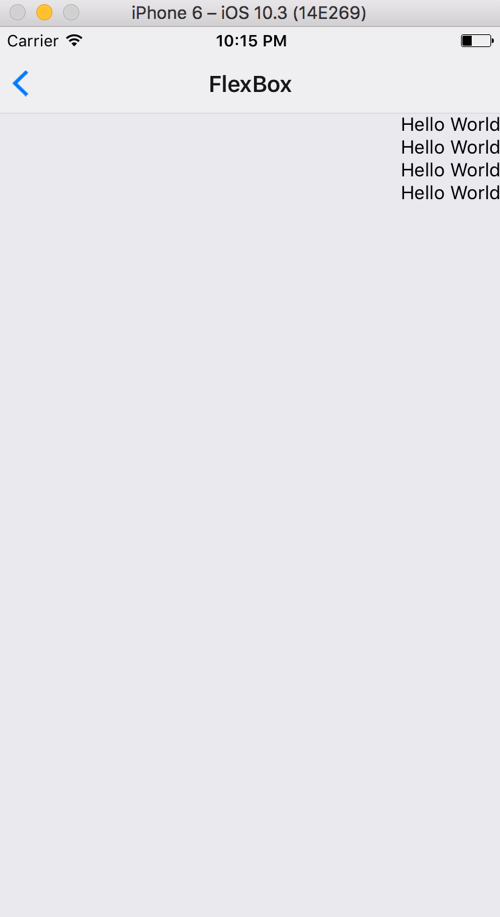
FlexBox
justifyContent:
container: {
flex: 1,
justifyContent: 'space-between'
}
<View style={styles.container}>
<Text>Hello World</Text>
<Text>Hello World</Text>
<Text>Hello World</Text>
<Text>Hello World</Text>
</View>'space-between'
FlexBox
alignItems
Determines the distribution of children along the secondary axis.
flexDirection:
column
⬆
⟷
⬇
⬅ ↕ ➡
alignItems: center
flexDirection:
row
alignItems: center
Default - 'stretch'
FlexBox

alignItems:
container: {
  flex: 1,
  alignItems: 'center'
}

<View style={styles.container}>
  <Text>Hello World</Text>
  <Text>Hello World</Text>
  <Text>Hello World</Text>
  <Text>Hello World</Text>
</View>
'center'
FlexBox
alignItems:
container: {
  flex: 1,
  alignItems: 'flex-end'
}

<View style={styles.container}>
  <Text>Hello World</Text>
  <Text>Hello World</Text>
  <Text>Hello World</Text>
  <Text>Hello World</Text>
</View>
'flex-end'
Flexbox Fun

Let's Play!
coding
exercise
Styling
- Inline
- Object
- StyleSheet
- FlexBox
Re-cap
🍽 Lunch 🍽
Please return at 1:00pm
Panel
Hooks!

Hooks!
- Lets you use state and other React features without writing a class
- Functions that let you “hook into” React state and lifecycle features from function components
- Don’t work inside classes — they let you use React without classes
useState()
- Allows you to use state in a functional component
- Can declare only one state variable at a time
- Able to set an initial state as an argument
- Use array destructuring to retrieve the value and setter
const [count, setCount] = useState(0)How does it work???

Let's refactor our App component with useState
code
FlatList
FlatList
- Inherits from ScrollView
- Renders an array of items
FlatList
Requires 3 props:
-
data
-
renderItem
-
keyExtractor
code
able to check an item
coding
exercise
Hints
-
items: string[]
- ["Socks", "Shoes"]
-
items: object[]
- [{ name: "Socks, ?: ??? }, { name: "Shoes", ?: ??? }]

FlatList
- Intro to FlatList
- Add ability to "check" an item
Re-cap
Componentize
Componentize
Preview
- Create Button Functional Component
- Create ListInput Functional Component
- Clear items
- Use useState hook in ListInput Component
Current App
coding exercise
Re-cap
- Create Button Functional Component
- Create ListInput Functional Component
- Clear items
- Use useState hook in ListInput Component
Componentize
☕️ Break ☕️
Please return at 3:30pm
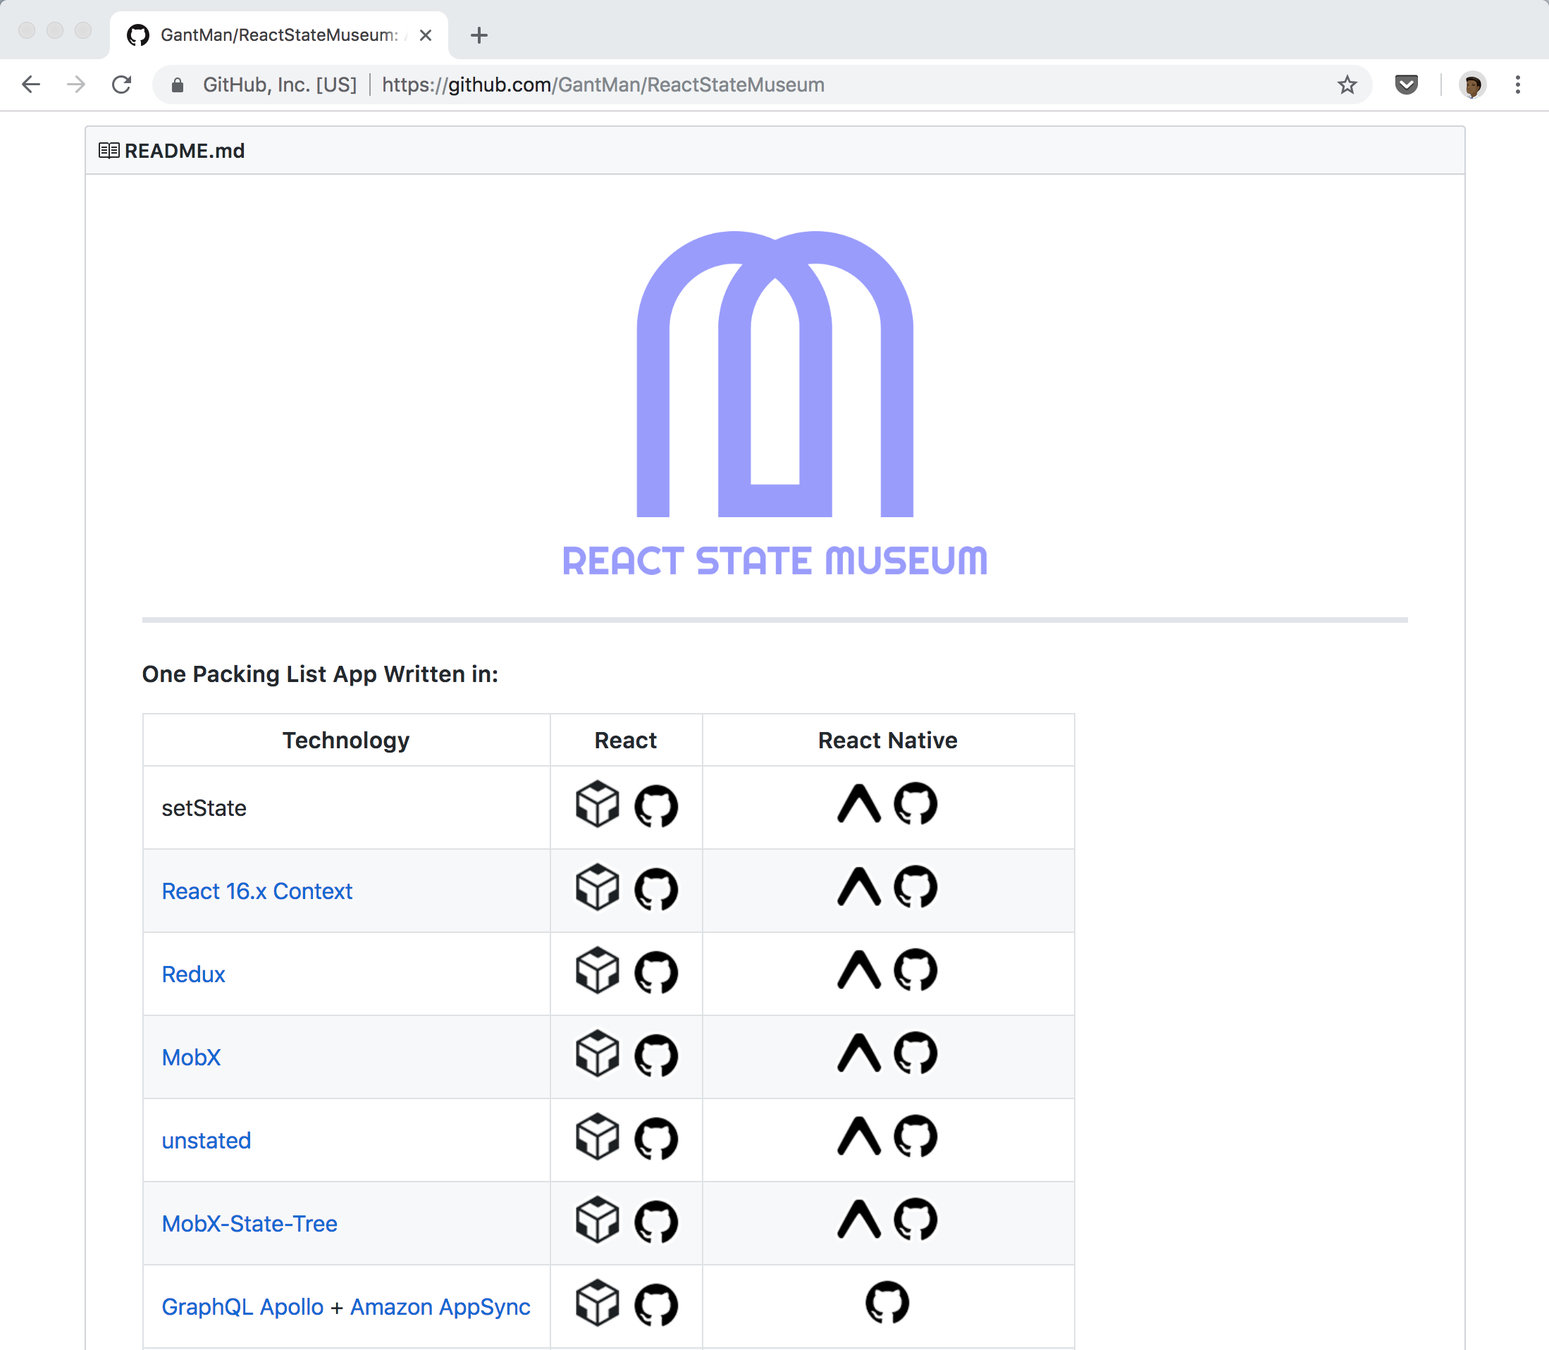
React State Museum

Reducer
Reducer
- The concept of a Reducer became popular with the rise of Redux as state management solution for React
- Basically reducers are there to manage state in an application
- A reducer is a function which takes two arguments:
- state
- action
Reducer
(state, action) => newStateconst counterReducer = (state, action) => {
return state + 1
}const counterReducer = (count, action) => {
return count + 1
}
state
Reducer
- Normally defined as an object { } with a `type` property
- Based on the `type` of the action, the reducer can perform conditional state transitions
action
Reducer
const counterReducer = (count, action) => {
  if (action.type === 'INCREASE') {
    return count + 1
  }

  if (action.type === 'DECREASE') {
    return count - 1
  }

  return count
}
action
Reducer
const counterReducer = (count, action) => {
  switch (action.type) {
    case 'INCREASE':
      return count + 1
    case 'DECREASE':
      return count - 1
    default:
      return count
  }
}
action
Reducer
state as { }
-
The state processed by a reducer function is immutable
-
That means the incoming state is never directly changed; therefore, the reducer function always has to return a new state object
-
We can use the spread operator to create a new state object from the incoming state and the part we want to change
Reducer
const counterReducer = (state, action) => {


}
state as { }
const counterReducer = (state, action) => {
  switch (action.type) {
    case 'INCREASE':
      return { ...state, count: state.count + 1 }
    case 'DECREASE':
      return { ...state, count: state.count - 1 }
    default:
      return state
  }
}
useReducer Hook
const [state, dispatch] = useReducer(reducer, initialState)dispatch
- Action object will tell how/what to update in the reducer state
- Pass the `action` object to the reducer function
dispatch({ type: "increment" })const initialState = { count: 0 }dispatch
reducer = (state, action) => {
  switch (action.type) {
    case 'increment':
      return {count: state.count + 1}
    case 'decrement':
      return {count: state.count - 1}
    default:
      throw new Error('Nobody here by that name!')
  }
}
const Counter = () => {
const [state, dispatch] = useReducer(reducer, initialState)
return (
<View>
<Text>Count: {state.count}</Text>
<Text onPress={() => dispatch({type: 'increment'})}>+</Text>
<Text onPress={() => dispatch({type: 'decrement'})}>-</Text>
</View>
)
}Let's move our app's state into a reducer so that it can be shared between 2 components
code
Navigation
Preview
- React Navigation
- Stack Navigator
- Tabs Navigator

Navigation
react-navigation
The community solution to navigation is a standalone library that allows developers to set up the screens of an app with just a few lines of code
Navigation
Main types of navigators:
StackNavigator
SwitchNavigator
TabNavigator
DrawerNavigator
Navigation
npm i react-navigation --save
Step 1: Install react-navigation
yarn add react-navigation
or
Navigation
npm i react-native-gesture-handler --save
Step 1a: Install react-native-gesture-handler
yarn add react-native-gesture-handler
or
Navigation
Step 1b: Link react-native-gesture-handler
react-native link react-native-gesture-handler

under the hood
Navigation
createStackNavigator
Step 2: import createStackNavigator
import { createStackNavigator } from "react-navigation"Step 3: import createAppContainer
import { createStackNavigator, createAppContainer } from "react-navigation"Navigation
createAppContainer
- Containers are responsible for managing your app state and linking your top-level navigator to the app environment
- On Android, the app container uses the Linking API to handle the back button
- The container can also be configured to persist your navigation state
- Props of createAppContainer
Navigation
Step 4: Create navigation screens using components
const MyHomeRoutes = createStackNavigator({
  Home: { screen: Home },
  Info: { screen: Info }
},{
  initialRouteName: "Home"
  }
})- StackNavigatorConfig: object
- RouteConfigs: object
createStackNavigator takes 2 arguments:
Navigation
StackNavigator - Basic Implementation
const Home = () => (
  <Text>Hello from Home</Text>
)

const Info = () => (
  <Text>Hello from Info</Text>
)

const AppStack = StackNavigator({
  Home: { screen: Home },
  Info: { screen: Info }
})

const App = createAppContainer(AppStack)

AppRegistry.registerComponent("App", () => App)
code
Tab Navigator
createBottomTabNavigator
import createBottomTabNavigator
import { createBottomTabNavigator } from "react-navigation"Tab Navigator
Create Tab routes using screens or other navigators
const Tabs = createBottomTabNavigator(
  {
    Home: HomeScreen,
    Input: InputScreen
  },
  {
    initialRouteName: "Home",
    tabBarOptions: {
      activeBackgroundColor: "orange",
      inactiveBackgroundColor: "yellow"
    }
  }
)
- BottomTabNavigatorConfig: object
- RouteConfigs: object
createBottomTabNavigator can also take 2 arguments:
Tab Navigator
code
Navigation
- React Navigation
Re-cap
- Stack Navigator
- Tabs Navigator
Context API
- Pass data deeply throughout your app without having to manually pass props down through multiple levels/components
Context API
const MyContext = React.createContext(defaultValue)
// Returns an object with 2 values:
// { Provider, Consumer }
// ...
const App = () => {
return (
<MyContext.Provider value={{ items: [] }}>
<ItemsScreen />
</MyContext.Provider>
)
}
AppRegistry.registerComponent(appName, () => App)
Context API
const ItemsScreen = () => {
  // Notice this component isn't passed any props!

  // Use the Consumer to grab the value from context
  return (
    <MyContext.Consumer>
      {value =>
        value.items.map(item => <Text>{item.name}</Text>)
      }
    </MyContext.Consumer>
  )
}
Context API
-
We have to wrap our content in a MyContext.Consumer
-
Use the render props pattern – passing a function as a child – to retrieve the value and display it
-
Introduces some unnecessary nesting
-
useContext
useContext
const MyContext = React.createContext(defaultValue)
// Returns an object with 2 values:
// { Provider, Consumer }
// ...
const App = () => {
return (
<MyContext.Provider value={{ items: [] }}>
<ItemsScreen />
</MyContext.Provider>
)
}
AppRegistry.registerComponent(appName, () => App)
useContext
import React, { useContext } from 'react'
import { MyContext } from './somewhere'

// ...

const ItemsScreen = () => {
  const value = useContext(MyContext)


}
import React, { useContext } from 'react'
import { MyContext } from './somewhere'

// ...

const ItemsScreen = () => {
  const value = useContext(MyContext)

  return value.items.map(item => <Text>{item.name}</Text>)
}
code
AsyncStorage
- Persist items in AsyncStorage
Preview
- Bring in AsyncStorage
- Lean Core
AsyncStorage
Main methods:
-
setItem
-
multiGet
-
getItem
-
multiSet
AsyncStorage
setItem(key: string, value: string, ?(error) => void)setItem
getItem(key: string, ?(error, result: ?string) => void)getItem
setItem("username", "FrankTheTank")getItem("username", (error, result) => console.log(error, result))AsyncStorage
multiSet(keyValuePairs: Array<Array<string>>, ?(errors) => void)multiSet
multiSet(
  [
    ["username", "FrankTheTank"],
    ["password", "password_snake_cased"]
  ],
  (errors) => console.log(errors)
)
AsyncStorage
multiGet(keys: Array<string>, ?(errors, result: Array<Array<string>>) => void)multiGet
multiGet(
  ["username", "password"],
  (errors, result) => console.log(result)
)

// [
//   ["username", "FrankTheTank"],
//   ["password", "password_snake_cased"]
// ]
AsyncStorage
- Persist items in AsyncStorage
Re-cap
- Bring in AsyncStorage
- Lean Core
Playground
Packing List App
Questions?
Wrapping Up
Reactotron
Solidarity
Ignite
Fin
Thank you all!
CR: 2019 RN Fundamentals
By Infinite Red
CR: 2019 RN Fundamentals
React Native Fundamentals Workshop Chain React 2019


