Basic React Native Concepts
ES6
New variable types
let
const
var
NEVER
Sometimes
Always
ES6
// var declaration
var x = 1

if (true) {
  var x = 2  // same variable!
  console.log(x)  // 2
}

console.log(x)  // 2
New variable types
- function scoped
// let declaration
let x = 1

if (true) {
  let x = 2  // different variable
  console.log(x)  // 2
}

console.log(x)  // 1
var
- global (declared outside any function)
- block-scoped - only available in the block in which they are declared
let
ES6
const key = "mykey"

key = "newkey"

// Uncaught TypeError:
// Assignment to constant variable.
New variable types -
const
- read-only reference to a value
- variable cannot be reassigned
ES6
const person = {
  name: "Jennifer",
  age: 43,
  occupation: "Dentist",
}
New variable types -
const
{
  name: "Jim",
  age: 43,
  occupation: "Dentist"
}
➡
person.name = "Jim"
{
  name: "Jennifer",
  age: 43,
  occupation: "Dentist",
}
➡
ES6
Arrow functions
ES5
ES6
var sayName =
function() {}
const sayName =
() => {}
() => {}
this
bound to global

ES6
const getFullName = (first, last) => {
  return first + " " + last
}
Functions - implicit vs explicit return
var getFullName = function(first, last) {
  return first + " " + last
}
ES5
ES6
const getFullName = (first, last) => first + " " + last

const getFullName = (first, last) =>
  first + " " + last
explicit
implicit
explicit
ES6
ES6
const sayName = (name) => console.log("I am " + name + " !")Arrow functions
Parameters
const sayName = name => console.log("I am " + name + " !")const addThree = (a, b, c) => a + b + cES6
const abc = ["a", "b", "c"]
const def = ["d", "e", "f"]
const alpha = [ ...abc, ...def ]

["a", "b", "c", "d", "e", "f"]
Spread operator
Spread array
const basics = {firstName: "Frank", lastName: "von Hoven"}
const attributes = {job: "Software Engineer"}
const person = {...basics, ...attributes, eyes: "brown"}

{
  firstName: "Frank",
  lastName: "von Hoven",
  job: "Software Engineer",
  eyes: "brown"
}
Spread object
...ES6
const name = person.name
const height = person.height
const location = person.location


console.log(name, height, location)
Object { destructuring }
ES5
const {
  name,
  height,
  location,
  sports
} = person

console.log(name, height, location)
ES6
const person = {
  name: "Chris",
  hairColor: "brown",
  height: "6'1",
  location: "Austin",
  sports: ["football", "tennis"]
}
// "Chris", "6'1", "Austin"Further Reading
https://github.com/lukehoban/es6features
ES6
JSX
- JSX is a syntax extension, compiled in a preprocessor step that adds XML syntax to JavaScript.
- You can definitely use React without JSX but JSX makes React a lot more elegant.
JSX
For a candy...
JSX stands for:
JavaScriptXML


JSX
This:
Compiles to:
<Text color="blue" >
  Click Me
</Text>
React.createElement(
Text,
{color: "blue"},
"Click Me"
)
React Native uses JSX
const MyComponent = <Text>Hello World</Text>const MyImage = <Image source={someSource} style={styleObj} />{ MyComponent }
{ MyImage }Embedding Expressions into JSX
const person = { name: "Chris", age: 22 }const MyComponent = <Text>Hello { person.name }</Text>Embedding Expressions into JSX
const person = { name: "Chris", age: 22 }const MyComponent = <Text>Hello { getName() }</Text>const getName = () => person.name Logic with JSX
const person = { name: "Chris", age: 22 }

if (person.age >= 20) {
  return <Text>{person.name}</Text>
} else {
  return <Text>Age is below 20</Text>
}
Logic with JSX
const person = { name: "Chris", age: 22 }

<Text>{person.name} {person.age > 20 ? "Is over 20" : "Is not over 20" }</Text>
ternary operator
JSX Children
<View>
  <Text>Hello!</Text>
  <Text>Good to see you here.</Text>
</View>
JSX Variables
const greeting = (
  <View>
    <Text>Hello!</Text>
    <Text>Good to see you here.</Text>
  </View>
)

// in component

{ greeting }
JSX
- Concise HTML/XML-like structures in the same file as our JavaScript code
- These expressions ➡ actual JavaScript code
tl;dr
- Syntactic sugar
Summary

Hello Packing List
- Start new project
- Examine structure
- Create first component
- Pass props
Preview
React Native Core Components
-
View
-
ScrollView
-
Text
-
TextInput
-
Image
-
TouchableOpacity
React Native vs HTML
| HTML | React Native |
|---|---|
| <div> | <View> |
| <p> | <Text> |
| <input /> | <TextInput /> |
| <button> | <TouchableOpacity /> |
Basic React Native Concepts
class MyComponent extends React.Component {
  render() {
    return (
     <Text>Hello World</Text>
    )
  }
}
class (stateful)
const MyComponent = () => (
  <Text>Hello World</Text>
)
<MyComponent />functional (stateless)
vs
Components ➡ React elements - what should appear on the screen.
Styling
Styles can be created one of three ways:
- inline
- object
- StyleSheet declaration
Styling
inline styles
<Text style={{color: "red"}}>Hello World</Text>

<View style={{width: 300}}>
Styling
style object
const styles = {
  text: {
    color: "red"
  }
}

<Text style={styles.text}>Hello World</Text>
Styling
StyleSheet
import { StyleSheet, View, Text } from "react-native"

const styles = StyleSheet.create({
  container: {
    width: 300,
    height: 130
  },
  text: {
    color: "red"
  }
})

<View style={styles.container}>
  <Text style={styles.text}>Hello World</Text>
</View>
StyleSheet.create({...})
code
Hello World
- Get app running
- Examine structure
- Create functional component
- Pass props
Re-cap
🍛 Lunch 🍛
Panel
Step 1
Step 1
- Able to write to and read from local state
- Introduce local state
Preview
Component State
import React from "react"
import { Text } from "react-native"

class App extends React.Component {
  state = { name: "Chris" }

// lifecycle methods

  render() {
    return (
     <Text>{this.state.name}</Text>
    )
  }
}
class
<App />- Contains local state
- Lifecycle methods
Basic React Native Components
import React from "react"
import { Text } from "react-native"

class App extends React.Component {
  constructor(props) {
    super(props)
    this.state = {
      name: "Chris",
    }
  }

  render() {
    return(
      <Text>{this.state.name}</Text>
    )
  }
}
Creating state
Using constructor to declare state
Basic React Native Concepts
import React from "react"
import { View, Text } from "react-native"

class App extends React.Component {
  state = { name: "Chris" }

  updateName = () => {
    this.setState({ name: "Amanda" })
  }

  render() {
    return(
      <View>
        <Text onPress={this.updateName}>
          {this.state.name}
        </Text>
      </View>
    )
  }
}
Updating state with
- Component needs to be re-rendered with the updated state
setState
- Enqueues changes to the component state
TextInput
Common props
-
value
-
placeholder
-
onChangeText
(val) => val: string
"string"
-
onSubmitEditing
"string"
() => {}
code
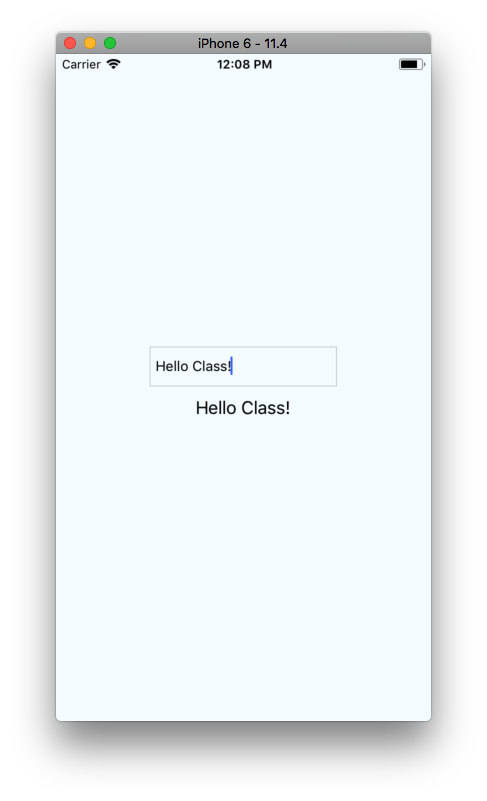
Step 1
- Able to write to and read from local state
- Introduce local state
Re-cap
Step 2
Step 2
- Introduce "items" array into local state
- Move the input to its own function - add a wrapper & buttons
Preview
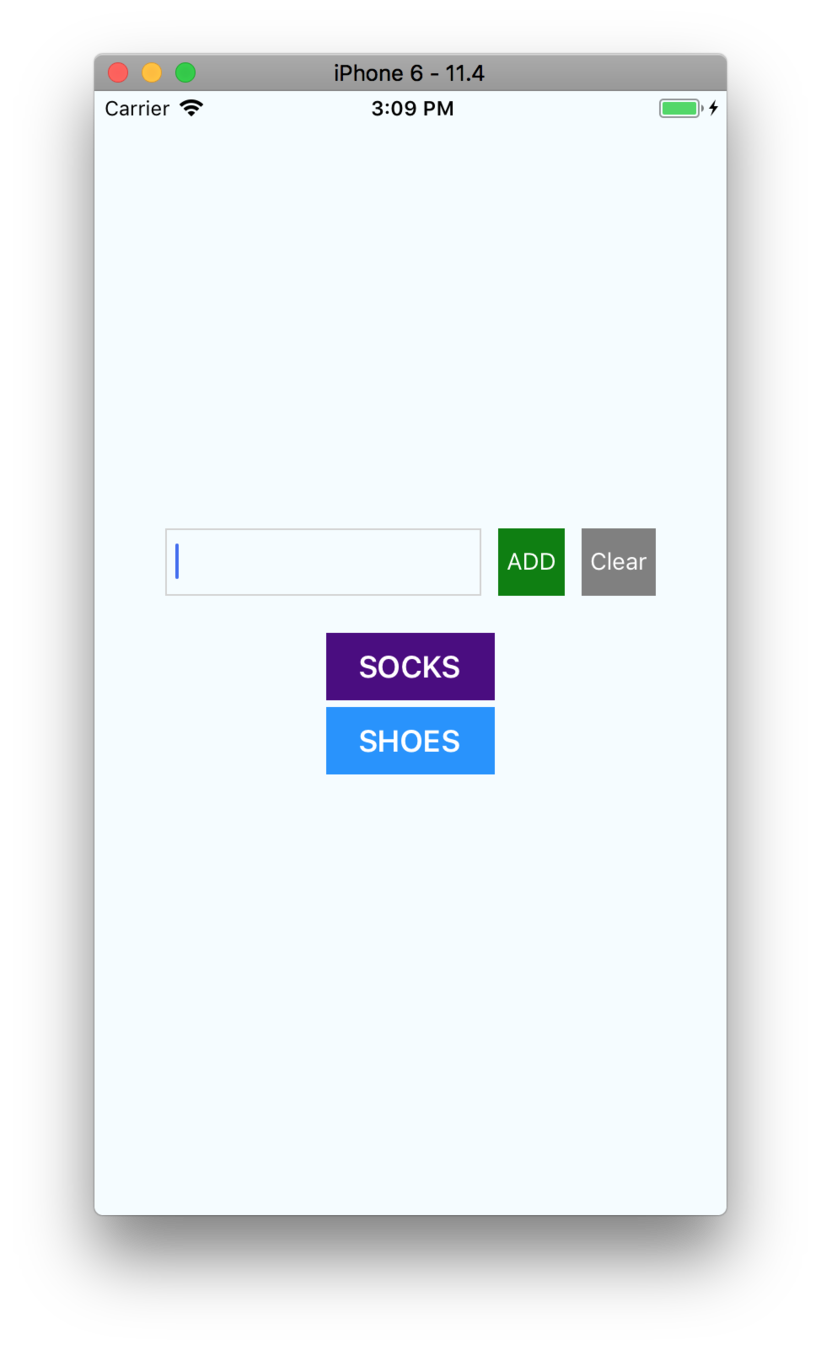
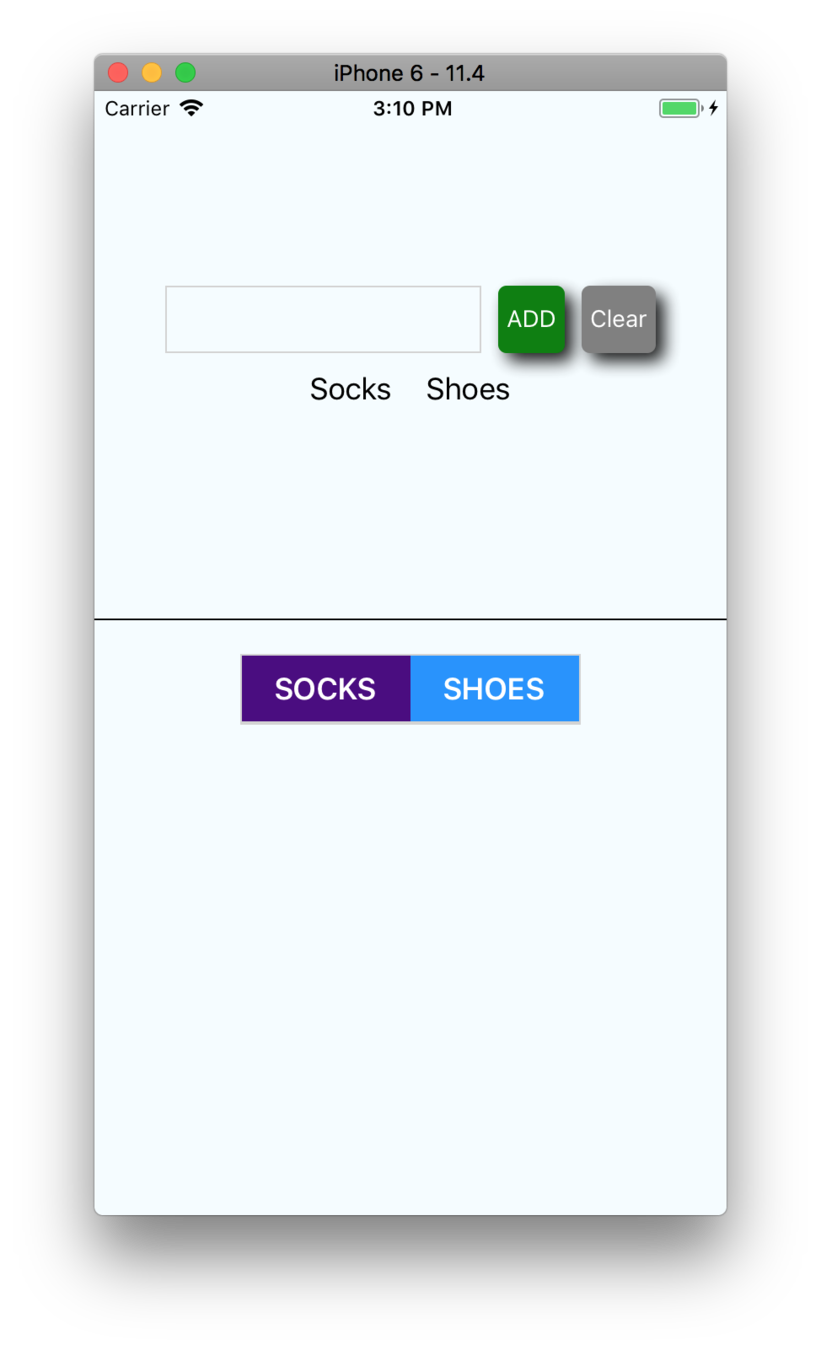
- Able to push inputted item into the items array
- Able to clear items from the items array
code
Step 2
- Introduce "items" array into local state
- Move the input to its own function - add a wrapper & buttons
Re-cap
- Able to push inputted item into the items array
- Able to clear items from the items array
Styles Intro
Styling
- Styles usually match CSS
backgroundColor
background-color
vs
- Prop names are camelCased
Styling
StyleSheet
import { StyleSheet, View, Text } from ‘react-native'

const styles = StyleSheet.create({
  text: {
    color: 'red'
  },
  bigText: {
    fontSize: 30
  }
})

<Text style={[styles.text, styles.bigText]}>Hello World</Text>
Array of styles
Styling
StyleSheet
import { StyleSheet, View, Text } from ‘react-native'

const styles = StyleSheet.create({
 text: {
    color: 'red'
  }
})

<Text style={[styles.text, { fontSize: 32 } ]}>Hello World</Text>
Combining inline styles with StyleSheet
Styling
Dynamic styling
state = {
  warning: true,
}

render() {
  const fontColor = this.state.warning ? 'red' : 'black'
  return (
    <View>
      <Text style={{color: fontColor}}>Hello World</Text>
    </View>
  )
}
Styling
- width / height - number
Main
non-flex styles
<View/>
- top / left / bottom / right - number
- position - string (absolute, relative)
- padding - number
- margin - number
- borderWidth - number
- borderColor - color
- backgroundColor - color
FlexBox
A component can specify the layout of its children using the flexbox algorithm. Flexbox is designed to provide a consistent layout on different screen sizes.
You will normally use a combination of:
-
flexDirection
-
alignItems
-
justifyContent
to achieve the right layout.
FlexBox
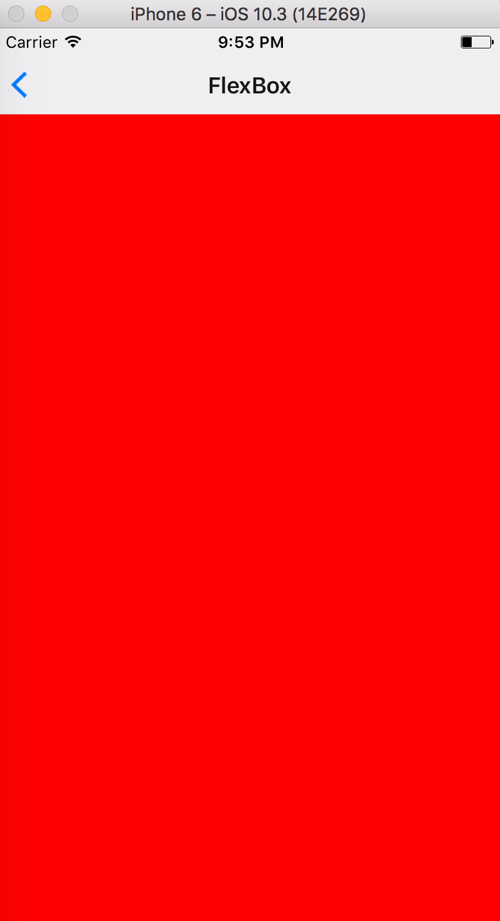
flex: number
container: {
  flex: 1
},
box1: {
  flex: 1,
  backgroundColor: 'red'
},
<View style={styles.container}>
<View style={styles.box1} />
</View>FlexBox
flex: number
container: {
  flex: 1
},
box1: {
  flex: 1,
  backgroundColor: 'red'
},
box2: {
  flex: 1,
  backgroundColor: 'orange'
},
<View style={styles.container}>
<View style={styles.box1} />
<View style={styles.box2} />
</View>FlexBox
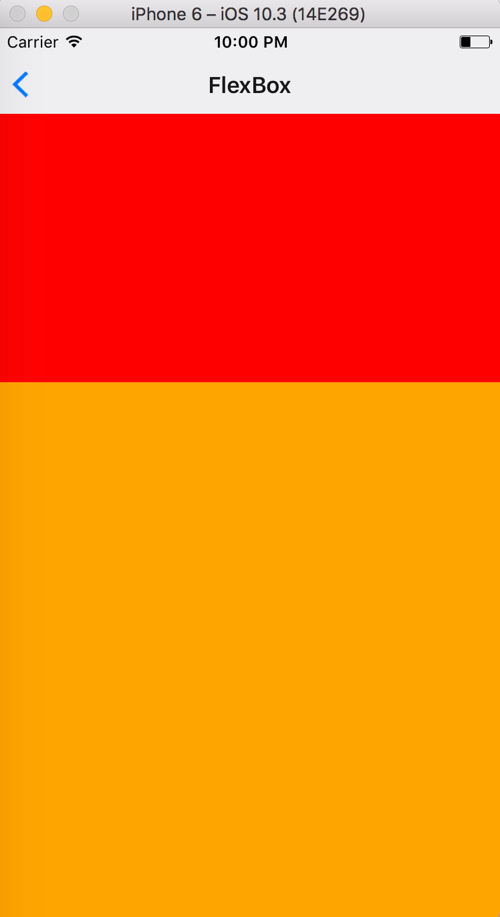
flex: number
container: {
  flex: 1
},
box1: {
  flex: 1,
  backgroundColor: 'red'
},
box2: {
  flex: 2, // "Change flex from 1 to 2"
  backgroundColor: 'orange'
},
<View style={styles.container}>
<View style={styles.box1} />
<View style={styles.box2} />
</View>FlexBox
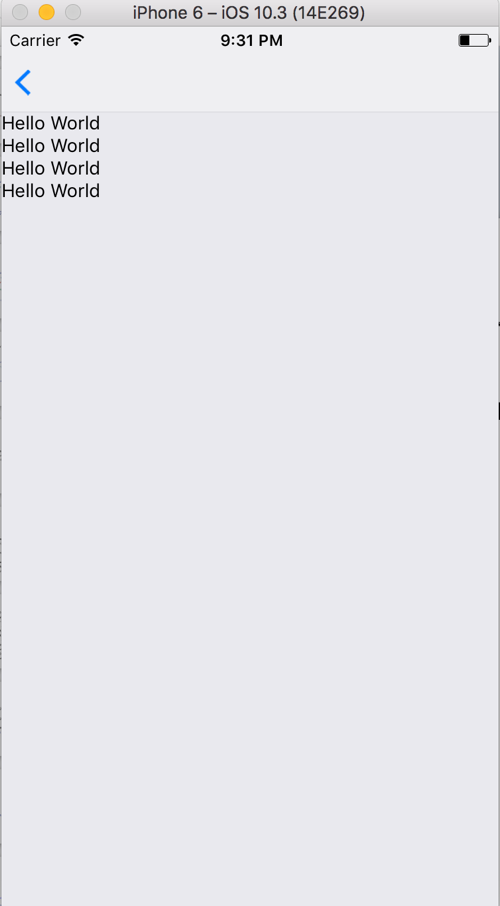
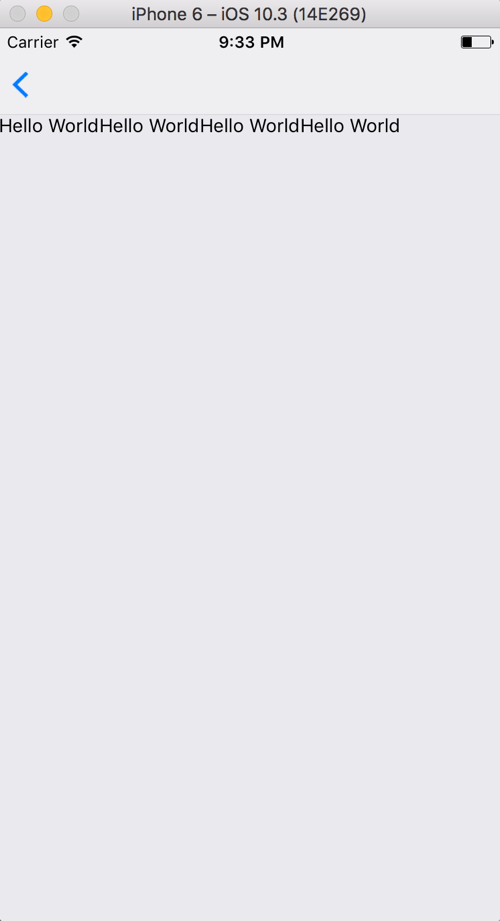
flexDirection
container: {
  flex: 1
}
<View style={styles.container}>
<Text>Hello World</Text>
<Text>Hello World</Text>
<Text>Hello World</Text>
<Text>Hello World</Text>
</View>- defines primary axis
- default is column
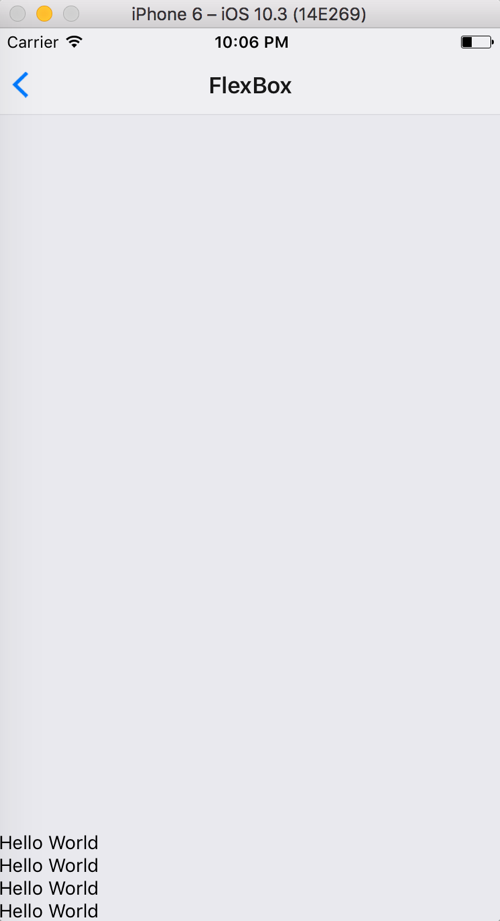
FlexBox
flexDirection
container: {
flex: 1,
flexDirection: 'row'
}<View style={styles.container}>
<Text>Hello World</Text>
<Text>Hello World</Text>
<Text>Hello World</Text>
<Text>Hello World</Text>
</View>- row
FlexBox
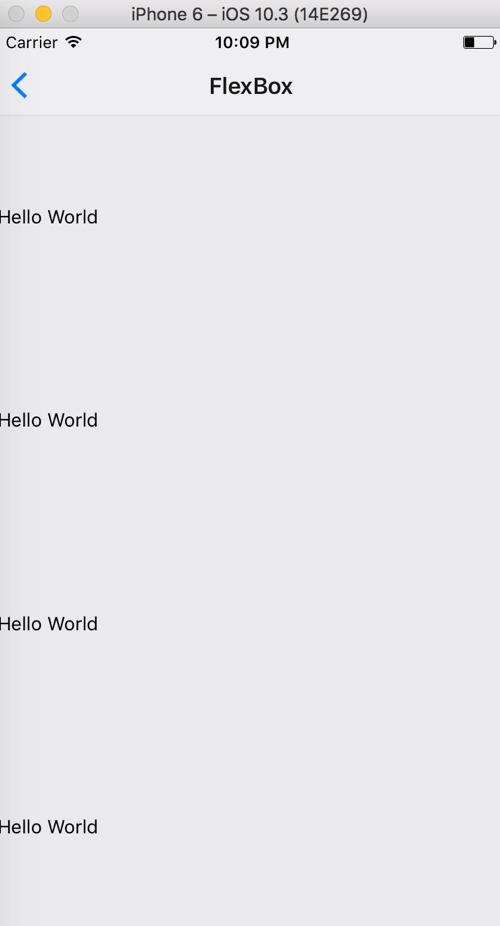
justifyContent
Determines the distribution of children along the primary axis.
flexDirection: column
flexDirection: row
⬆
⬇
⬅ ➡
FlexBox
justifyContent:
- flex-start
- center
- flex-end
- space-around
- space-between
FlexBox

justifyContent:
<View style={styles.container}>
  <Text>Hello World</Text>
  <Text>Hello World</Text>
  <Text>Hello World</Text>
  <Text>Hello World</Text>
</View>'center'
container: {
flex: 1,
justifyContent: 'center'
}
container: {
flex: 1,
justifyContent: 'flex-end'
}
container: {
flex: 1
}
'flex-end'
container: {
flex: 1,
justifyContent: "space-around"
}
'space-around'
container: {
flex: 1,
justifyContent: "space-between"
}
'space-between'
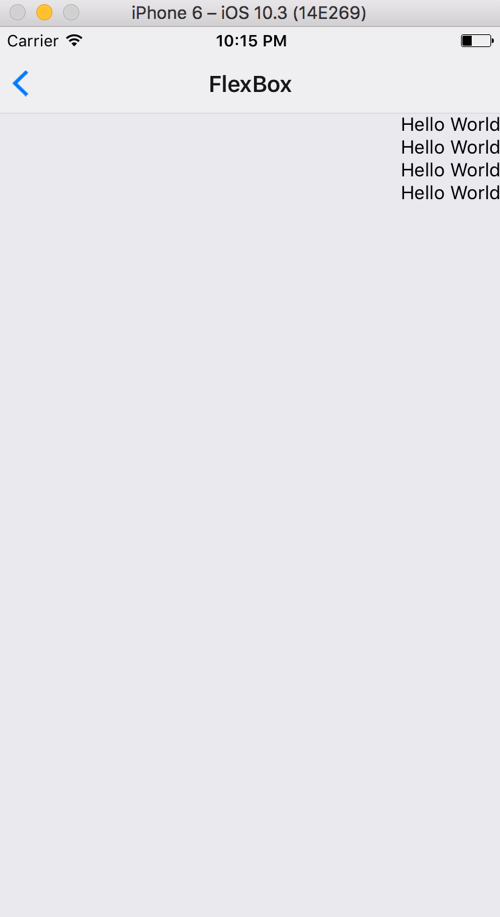
FlexBox
alignItems
Determines the distribution of children along the secondary axis.
flexDirection: column
⬆
⟷
⬇
⬅ ↕ ➡
alignItems: center
flexDirection: row
alignItems: center
Default - 'stretch'
horizontal axis
vertical axis
FlexBox

alignItems:
container: {
flex: 1,
alignItems: 'center'
}'center'
in action
'flex-end'
<View style={styles.container}>
  <Text>Hello World</Text>
  <Text>Hello World</Text>
  <Text>Hello World</Text>
  <Text>Hello World</Text>
</View>container: {
flex: 1,
alignItems: 'flex-end'
}
Play
Step 3
Step 3
- Manipulate controlled component: Clear input with ref
- Introduction to controlling a component - TextInput
Preview
- Add more styling - corners & shadows
Refs
Can be assigned one of two ways:
- String
- Callback
ref="myComponent"
ref={(ref) => this.myComponent = ref}

code
Step 3
- Manipulate controlled component: Clear input with ref
- Introduction to controlling a component - TextInput
Re-cap
- Add more styling - corners & shadows
Step 4
Step 4
- Intro to FlatList
- Add ability to "check" an item
Preview
FlatList
render() {
  const data = [
    { key: "Chris" },
    { key: "Amanda" }
  ]

  return (
    <View>
      <FlatList
        data={data}
        renderItem={({ item }) =>
          <Text>{item.key}</Text>}
      />
    </View>
  )
}
Requires 2 props:
-
data
-
renderItem
[ ]
({item}) => { }
FlatList
render() {
  const data = [
    { name: "Chris" },
    { name: "Amanda" }
  ]

  renderItem = ({ item }) => {
    return <Text>{item.name}</Text>
  }

  return (
    <View>
      <FlatList
        data={data}
        renderItem={this.renderItem}
        keyExtractor={item => item.name}
      />
    </View>
  )
}
keyExtractor
- Key is used for caching
- To track item re-ordering
FlatList
render() {
  const data = [
    { name: "Chris" },
    { name: "Amanda" }
  ]

  renderItem = ({ item }) => {
    return <Text>{item.name}</Text>
  }

  return (
    <View>
      <FlatList
        data={data}
        renderItem={this.renderItem}
        keyExtractor={item => item.name}
        ItemSeparatorComponent={() => <View />}
      />
    </View>
  )
}
ItemSeparatorComponent
FlatList
render() {
  const data = [
    { name: "Chris" },
    { name: "Amanda" }
  ]

  renderItem = ({ item }) => {
    return <Text>{item.name}</Text>
  }

  return (
    <View>
      <FlatList
        data={data}
        renderItem={this.renderItem}
        keyExtractor={item => item.name}
        refreshing={this.state.refreshing}
        onRefresh={this.onRefresh}
      />
    </View>
  )
}
onRefresh
code
Step 4
- Intro to FlatList
- Add ability to "check" an item
Re-cap
break
Welcome Day 2
Review
StoryBook

Whack-A-Mole

Packing List
Preview
- Get ready for multiple screens
- Create “components” folder - /components
- Create Button component
- Create ListInput component
code
Packing List
Re-cap
- Get ready for multiple screens
- Create “components” folder - /components
- Create Button component
- Create ListInput component
break
react-navigation
Navigation
- Install React Navigation
Preview
- Pass the items via navigation ➡ input-screen as props
- Create an input-screen.js
Navigation
react-navigation
The community solution to navigation is a standalone library that allows developers to set up the screens of an app with just a few lines of code.
Navigation
Main types of navigators:
StackNavigator
SwitchNavigator
TabNavigator
DrawerNavigator
Navigation
StackNavigator
npm i react-navigation --save
Step 1: Install react-navigation
yarn add react-navigation
or
Navigation
createStackNavigator
Step 2: import createStackNavigator
import { createStackNavigator } from "react-navigation"Navigation
Step 3: Create navigation screens using components
const MyHomeRoutes = createStackNavigator(
  {
    Home: { screen: Home },
    Info: { screen: Info }
  },
  {
    initialRouteName: "Info"
  }
)- StackNavigatorConfig: object
- RouteConfigs: object
createStackNavigator takes 2 arguments:
Navigation
Step 4: Render Navigation
AppRegistry.registerComponent("App", () => App)
Navigation
StackNavigator - Basic Implementation
const Home = () => (
  <Text>Hello from Home</Text>
)

const Info = () => (
  <Text>Hello from Info</Text>
)

const App = StackNavigator({
  Home: { screen: Home },
  Info: { screen: Info }
})

AppRegistry.registerComponent("App", () => App)
Navigation
Each screen component in your app is provided with the navigation prop automatically.
- navigate - go to a screen by key
- getParam - is a helper to access a param that may be on the route
- state - current navigation state/routes
- goBack - go back to a screen by key or one screen
It looks like this: this.props.navigation
Common methods on this.props.navigation
code
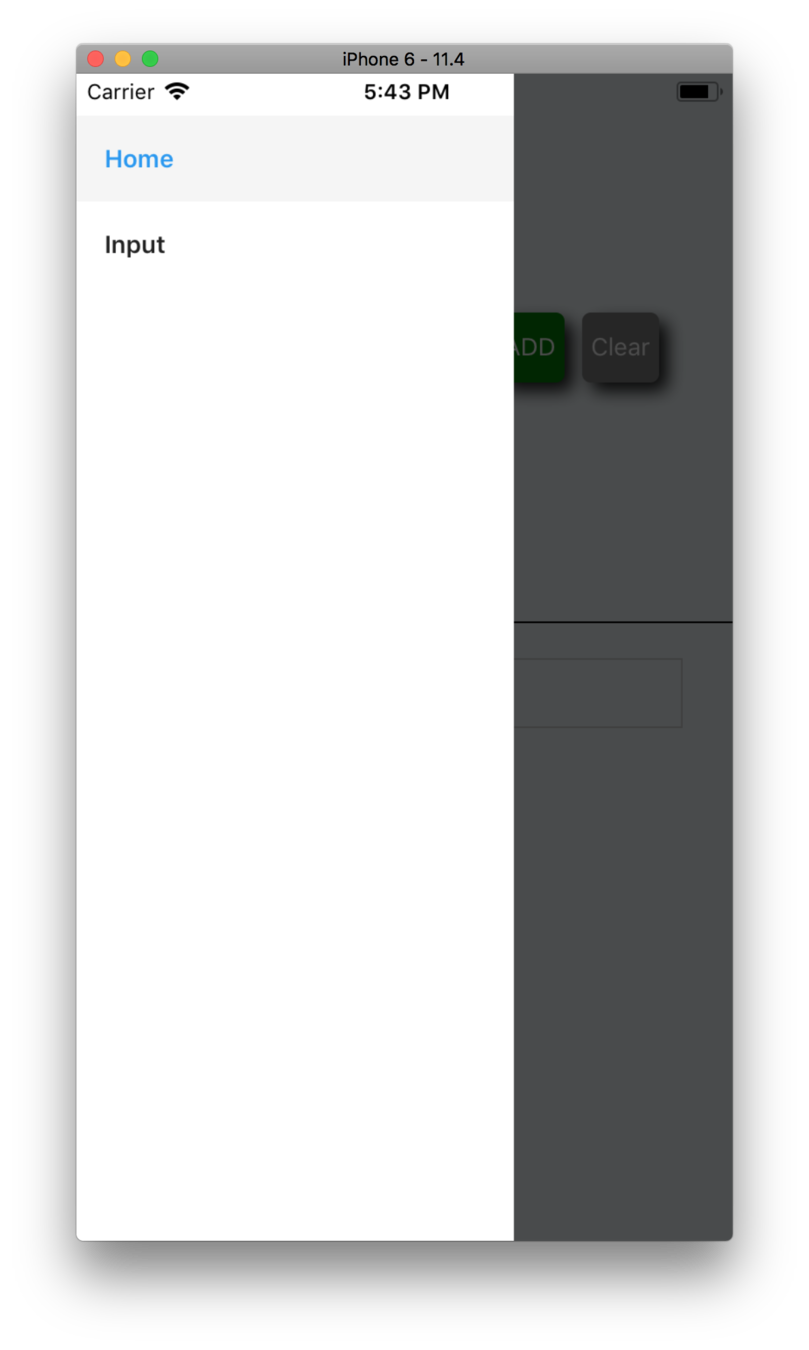
Drawer Navigator
createDrawerNavigator
import createDrawerNavigator
import { createDrawerNavigator } from "react-navigation"Drawer Navigator
Create Drawer routes using screens
const DrawerStack = createDrawerNavigator(
  {
    Home: HomeScreen,
    Input: InputScreen
  },
  {
    drawerWidth: 250
  }
)
- DrawerNavigatorConfig: object
- RouteConfigs: object
createDrawerNavigator can also take 2 arguments:
Drawer Navigator
moreCode
Navigation
- Install React Navigation
Re-cap
- Pass the items via navigation ➡ input-screen as props
- Create an input-screen.js
State Management
When is setState not enough?


🍛 Lunch 🍛
Panel
Add Unstated
Preview
- Manage state with Unstated
- https://github.com/jamiebuilds/unstated
Unstated
npm i unstated --save
yarn add unstated
or
Unstated
Unstated gives us 3 things:
- Container class
- Subscribe component
- Provider component
Unstated -
Create container to store state by extending the Container class:
import { Container } from "unstated"

class RootStore extends Container {
  // ...
}

export default RootStore
Container
Manage state in the Container using:
import { Container } from "unstated"

class RootStore extends Container {
  state = { items: [] }

  addItem = item => {
    const newItem = { name: item.name, checked: false }
    this.setState({ items: [...this.state.items, newItems] })
  }

  checkItem = selectedItem => {
    this.setState({
      items: this.state.items.filter(item => {
        return item.name === selectedItem.name
        ? {name: item.name, checked: true }
        : item
      })
    })
  }
}

export default RootStore-
state
-
setState
Unstated -
Container
import { PackingListScreen } from "../screens/packing-list-screen"
import { InputScreen } from "../screens/input-screen"
import { createStackNavigator } from "react-navigation"
import { Provider } from "unstated"

const RootStack = createStackNavigator(
  {
    Home: PackingListScreen,
    Input: InputScreen
  }
)

class App extends Component {
  render() {
    return (
      <Provider>
        <RootStack />
      </Provider>
    )
  }
}

export default App-
Stores Container instances
-
Provider's children subscribe to the instances
Unstated -
Provider
import React from "react"
import { Subscribe } from "unstated"
import { RootStore } from "./RootStore"

class MyScreen extends React.Component {

  render() {
    return (
      <View>
        <Subscribe to={[RootStore]}>
          {rootStore => (
            rootStore.items.map(item => <Text>{item.name}</Text>)
          )}
        </Subscribe>
      </View>
    )
  }
}-
Function as children
Unstated -
Subscribe
Takes:
- to={[stores]}
&
code
Add Unstated
Re-cap
- Manage state with Unstated
- https://github.com/jamiebuilds/unstated
Async Storage

Step 9
- Persist items in AsyncStorage
Preview
- Bring in AsyncStorage
AsyncStorage
Main methods:
-
setItem
-
multiGet
-
getItem
-
multiSet
AsyncStorage
setItem(key: string, value: string, ?(error) => void)setItem
getItem(key: string, ?(error, result: ?string) => void)getItem
setItem("username", "FrankTheTank")getItem("username", (error, result) => console.log(error, result))AsyncStorage
multiSet(keyValuePairs: Array<Array<string>>, ?(errors) => void)multiSet
multiSet(
  [
    ["username", "FrankTheTank"],
    ["password", "password_snake_cased"]
  ],
  (errors) => console.log(errors)
)
AsyncStorage
multiGet(keys: Array<string>, ?(errors, result: Array<Array<string>>) => void)multiGet
multiGet(
  ["username", "password"],
  (errors, result) => console.log(result)
)

// [
//   ["username", "FrankTheTank"],
//   ["password", "password_snake_cased"]
// ]
code
AsyncStorage
- Persist items in AsyncStorage
Re-cap
- Bring in AsyncStorage
Tests
break
Energy Up Exercise

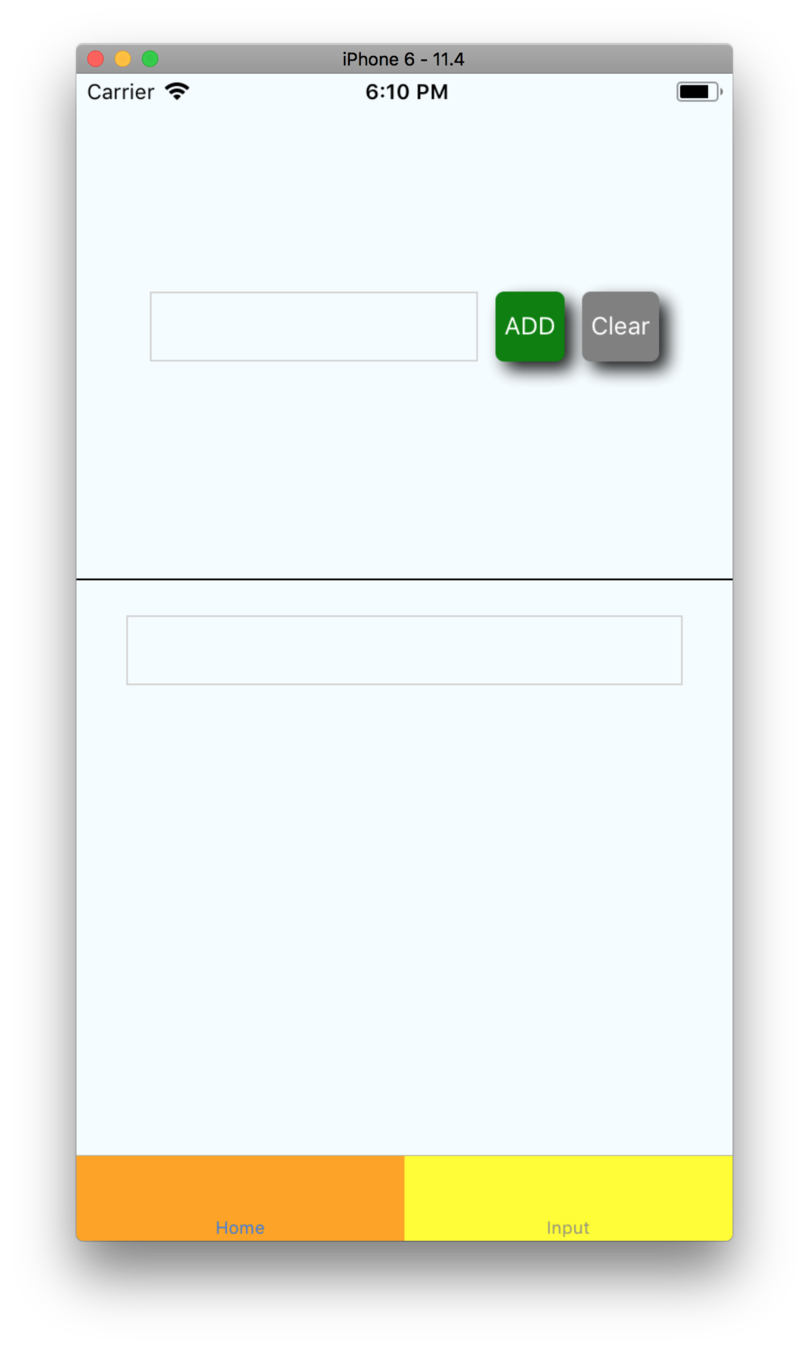
Navigation Tabs
Tab Navigator
createBottomTabNavigator
import createBottomTabNavigator
import { createBottomTabNavigator } from "react-navigation"Tab Navigator
Create Tab routes using screens or other navigators
const Tabs = createBottomTabNavigator(
  {
    Home: HomeScreen,
    Input: InputScreen
  },
  {
    initialRouteName: "Home",
    tabBarOptions: {
      activeBackgroundColor: "orange",
      inactiveBackgroundColor: "yellow"
    }
  }
)
- BottomTabNavigatorConfig: object
- RouteConfigs: object
createBottomTabNavigator can also take 2 arguments:
Tab Navigator
Step 10

Step 10
- Make app match prototype
Preview
- Styling exercise
- Installing a native module - vector icons
-
react-native link
- Tabs Navigator
code
Step 10
- Make app match prototype
Re-cap
- Styling exercise
- Installing a native module - vector icons
-
react-native link
- Tabs Navigator
See You Tomorrow!

Welcome Day 3
TypeScript/Flow
fetch

fetch
fetch("https://www.tacobell.com", {method: "get"})
  .then((response) => response.json())
  .then((responseJson) => {
    return responseJson.tacos
  })
  .catch((error) => {
    console.error(error)
})- API for networking
Raw example:
- Returns a Promise
- Comes for free with React Native
code
fetch

Networking Libraries
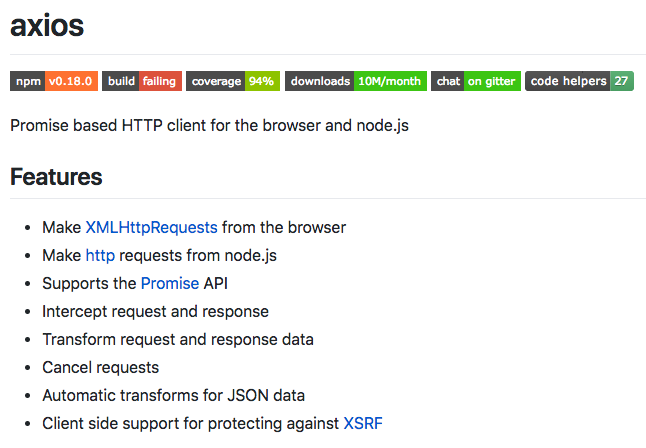
Axios - https://github.com/axios/axios
Networking Libraries
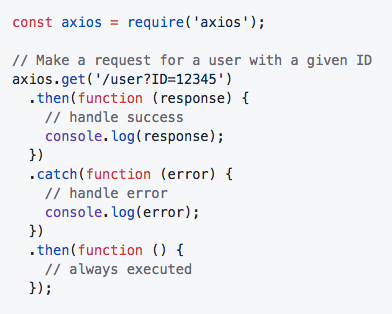
Axios Example
Networking Libraries
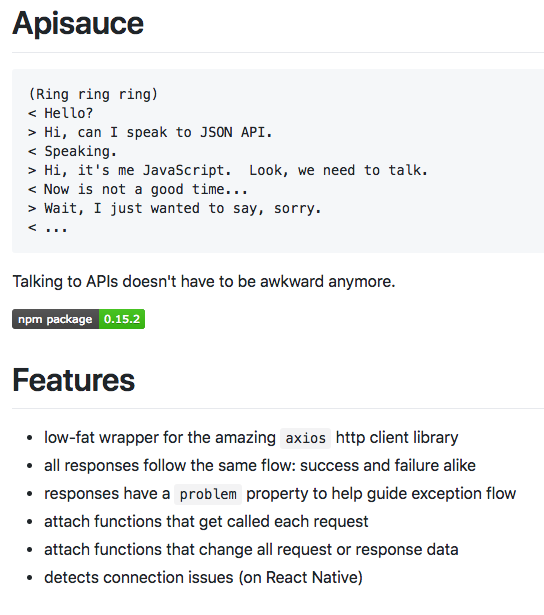
Apisauce - https://github.com/infinitered/apisauce
Networking Libraries
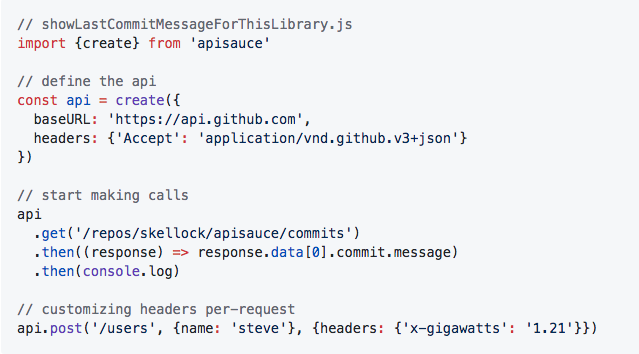
Apisauce Example

Andross
Bowser
🍛 Lunch 🍛
Panel
Build Your Own App
Examples
-
Conference App
-
Textables App
-
Packing List App - deeper
-
Soundboard App
-
Tour App - Austin
-
Receipt Management App
Final Farewell

uShip - Basic React Native Concepts
By Infinite Red
uShip - Basic React Native Concepts
Slides for the uShip React Native Fundamentals Workshop, presented by Infinite Red Academy. All Rights Reserved.


